 SimpliForge
The complete illustrated guide, from your first image to your next print. Search by topic, browse the chapters, or download the PDF for offline reading. The same guide is bundled in the desktop app.
No chapters match. Try fewer words or Clear.
Simpliforge User Guide
Version 1.4.8
Simpliforge prepares images and filament plans for HueForge. You can simplify an image, plan a printable stack, edit the height of selected areas, manage your filament collection, and transfer the result to a running HueForge project. Image processing happens on your computer.
This guide describes the current Simpliforge workspace. Older ColorNinja documents describe earlier releases and may use different names or layouts. The FAQ provides short answers and troubleshooting. Download the PDF user guide for offline reading.
All example artwork in this guide was created specifically for the documentation. It does not reproduce a user's artwork or third-party characters. Download the landscape, Color Pop garden, and relief badge to follow along. The sample filament colors used in screenshots are demonstration data, not measured spool recommendations.



Contents
- Install and update
- Your first project
- Find your way around
- Choose a workflow
- Shape the image
- Compare and inspect results
- Choose filaments for a project
- Manage your filament library
- Measure with TD1 or TD1S
- Plan the print
- Inspect layers and select visible areas
- Edit regions
- Add borders
- Add an imprint
- Make a jigsaw
- Save projects and recover work
- Presets, profiles, and preferences
- Check print readiness
- Export files
- Send to HueForge
- Sync filaments with HueForge
- Practice projects
- Keyboard and pointer reference
- Troubleshooting
- Command-line use
- Terms used in this guide
Install and update
Simpliforge 1.4.8 supplies updated Windows x64 packages. The previous 1.4.6 release retains the Linux x64, macOS Intel, and macOS Apple Silicon application and bridge packages; those packages do not include the 1.4.7 or 1.4.8 changes. Download the application and matching bridge for your computer. Packages are published after their build and software checks pass. See Production package scope.
| Platform | Choose | Notes |
|---|---|---|
| Windows x64 | Combined bridge installer, ordinary installer, or portable ZIP | The combined installer installs the application and optional HueForge bridge. |
| Linux x64 | Previous 1.4.6 application .tar.gz and matching bridge ZIP |
Built for Ubuntu 24.04; install the bridge separately through HueForge. |
| macOS Intel | Previous 1.4.6 application and bridge ZIPs | Install the bridge separately through HueForge. |
| macOS Apple Silicon | Previous 1.4.6 application and bridge ZIPs | Install the bridge separately through HueForge. |
Choose the same architecture for Simpliforge, HueForge, and its bridge. Keep one Simpliforge bridge installed, and restart HueForge after updating it.
This version uses Simpliforge bridge 0.8.0 with HueForge 0.9.4.4 or later. The Windows combined installer checks executable version metadata. The bridge checks the host's capabilities before enabling each operation and preserves its existing plugin identity when upgrading.
Windows combined installer
- Save your work and close both Simpliforge and HueForge.
- Run
Simpliforge-1.4.8-windows-x64-with-hueforge-setup.exe. - Leave HueForge bridge (install or repair) selected to install both components. Clear it if you only want Simpliforge.
- Read any compatibility message. Automatic plugin installation requires HueForge 0.9.4.4 or later; an ineligible installation leaves application-only setup available.
- Complete installation, then open HueForge and Simpliforge.
- Follow any plugin approval requested by HueForge itself.
The combined installer contains the full Simpliforge application and the optional bridge. Simpliforge-1.4.8-windows-x64-setup.exe installs the application without automatic bridge installation. Extract Simpliforge-1.4.8-windows-x64.zip to run the portable application; keep the extracted files together. For manual plugin installation, use SimpliforgeBridgePlugin-0.8.0-windows-x64.zip or the same plugin bundled under plugins/hueforge-bridge/SimpliforgeBridgePlugin-windows-x64.zip.
Windows desktop builds require the Microsoft Edge WebView2 Runtime. The CLI does not. These Windows executables and the plugin are unsigned. Verify the supplied package against SHA256SUMS.txt before accepting an operating-system publisher warning.
macOS application and bridge
Use the previous 1.4.6 release assets for these steps.
- Save your work and close Simpliforge and HueForge.
- Extract the matching application ZIP and move Simpliforge.app to Applications.
- Open HueForge 0.9.4.4 or later and choose Manage Plugins -> Install.
- Select
SimpliforgeBridgePlugin-0.8.0-macos-arm64.zipfor Apple Silicon orSimpliforgeBridgePlugin-0.8.0-macos-x64.zipfor Intel. - Complete HueForge's plugin approval and restart it if requested. Keep one Simpliforge bridge installed.
- Open Simpliforge, prepare a preview, and use Send to HueForge.
macOS 13 or later is required. These application and bridge packages have no publisher certificate or notarization. Verify their checksums before following any macOS security prompt. Installation is manual; the Windows combined installer does not apply to macOS. Native software checks use a simulated host; verify an actual HueForge transfer and save/reopen cycle before relying on a new installation.
Linux application and bridge
Use the previous 1.4.6 release assets for these steps.
Extract
Simpliforge-1.4.6-linux-x64.tar.gzand keep the extracted files together.Install the desktop runtime on Ubuntu 24.04 if needed:
sudo apt install libgtk-3-0t64 libwebkit2gtk-4.1-0Run
./Simpliforgefrom the extracted application folder.In HueForge 0.9.4.4 or later, choose Manage Plugins -> Install and select
SimpliforgeBridgePlugin-0.8.0-linux-x64.zip.Complete HueForge's approval and restart it if requested. The bridge ZIP contains only the Simpliforge plugin.
Linux bridge installation is manual. Open HueForge can use a matching HueForge executable installed on your application search path; otherwise open HueForge yourself and refresh the connection. The bridge communicates through a local socket restricted to your user account. The supplied bridge requires HueForge's compatible runtime libraries; it does not replace them.
Upgrading
Application update checks remain disabled for this production version. Install a newer available release manually. Close both programs when upgrading the bridge, and reopen HueForge afterward so it loads the new plugin. Updating Simpliforge while leaving HueForge running can leave the old bridge active until HueForge restarts.
Keep a saved .simpliforge project before trying a new release. Older applications may reject projects containing newer features. Existing ColorNinja projects and profiles remain readable where their formats are supported; save a new Simpliforge copy after opening them.
If an existing installation manages the bridge, use the combined installer for its upgrade. An application-only installer cannot safely take over that bridge-managed installation.
Your first project
For an interactive introduction, use the first-run welcome or open Help (F1) -> First project walkthrough. See Interactive walkthroughs for replay, skipping and advanced lessons.
Use the original landscape example for this walkthrough.
- Choose File -> Open image, or drag the image into the application.
- Keep Color Match, the default workflow for fresh settings.
- Open Filaments and select your filament library. Confirm that eligible filaments are listed. For an offline practice session, select the supplied practice library; its invented colors and TD values are only for learning the controls, not a real print recipe.
- Return to Image. Start with Maximum filaments: 8, Balanced smoothing, and Preserve details enabled.
- Open Print. Set your intended print width, first layer height, regular layer height, and base depth. Match these to the eventual HueForge and slicer settings.
- Allow Auto preview to finish, or choose Refresh preview. Inspect both the result and its layer stack.
- Choose File -> Save project and save
Landscape.simpliforge. - Open Print readiness. Review the current preview, physical plan, geometry and filament advisories before choosing an output.
- Choose Send to HueForge, or export a HueForge project (.hfp) for opening later.
If you do not have a filament library ready, choose Simple reducer and practice with an eight-color PNG first. That workflow needs no filament data.
When practicing library edits with demonstration entries, turn filament auto-sync off in Preferences so newly created practice records are not added to a running HueForge library.
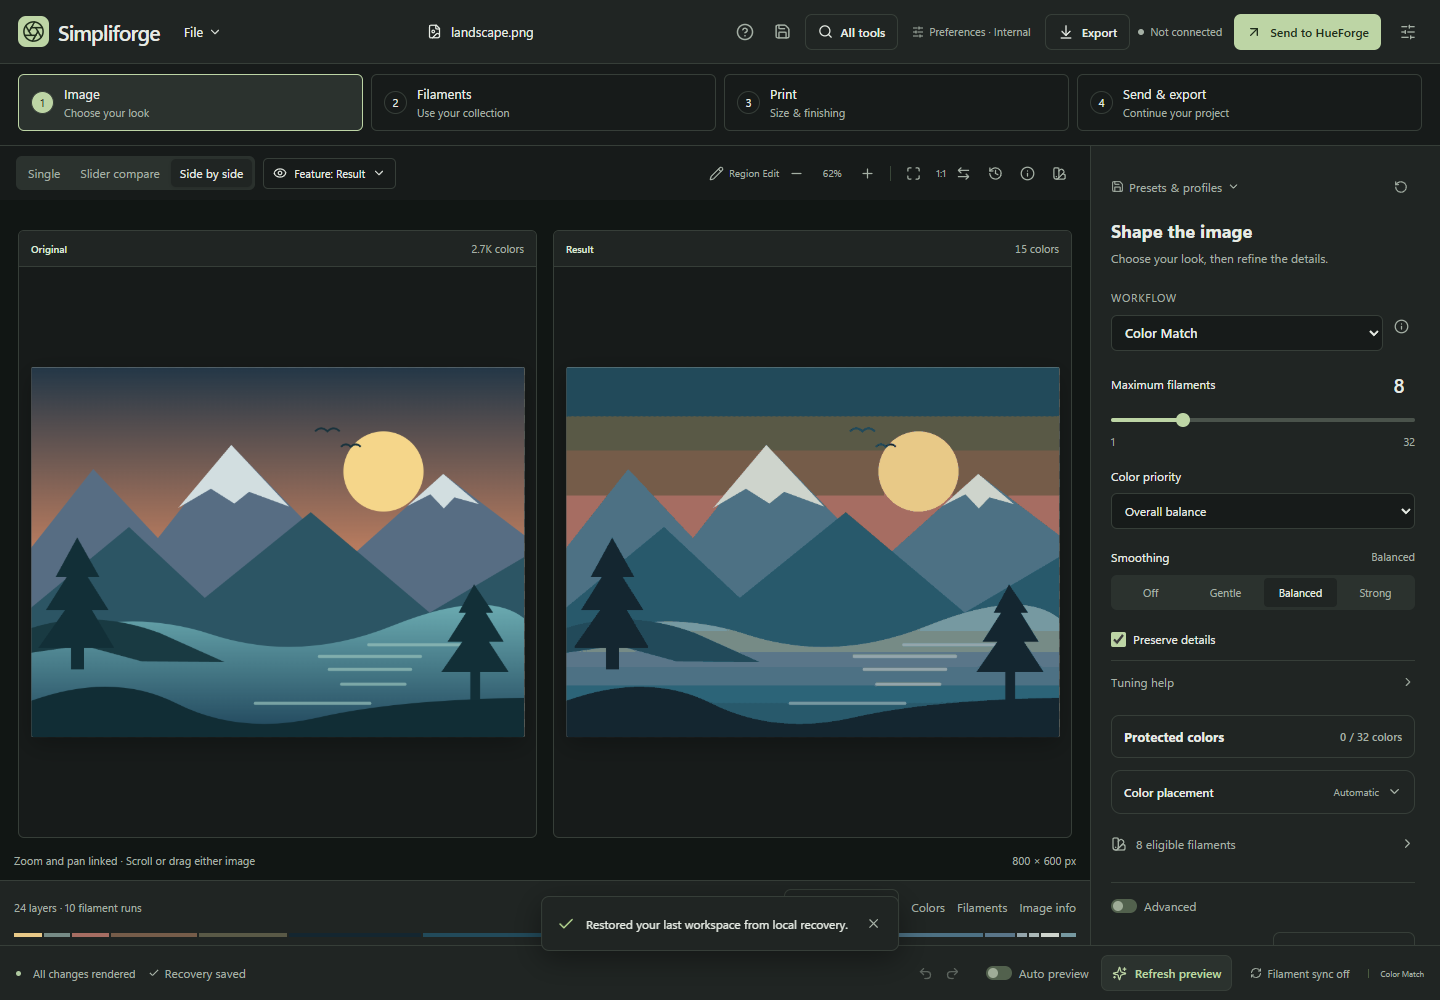
The four workflow steps organize the controls. The image remains central, and the right panel scrolls independently.
Interactive walkthroughs
The first-run welcome offers Start walkthrough with the built-in sample, Use current image for an existing workspace, or Use my image to open your own artwork. Choose Skip walkthrough to dismiss it; this choice is remembered locally. Starting or completing a tour also dismisses the automatic welcome. Replay through Help (F1) -> First project walkthrough at any time.
The main tour has nine steps: artwork, workflow, filament library, base and final filament, color/detail tuning, preview, print dimensions, saving a project, and Send to HueForge. A Look here spotlight follows the real control while the guide explains what to check. Use Back, Next, the lesson selector, More detail, or Skip; Escape also leaves the tour.
Choose Explore advanced topics from the welcome or completion screen, or Help -> Advanced topics, for 16 optional lessons:
| Group | Topics |
|---|---|
| Planning settings | Analysis resolution, smoothing, protected colors, automatic depth, filament returns and swaps, lighting and TD. |
| Feature workflows | Workflow choices and Color Pop hue selection. |
| Image editing | Comparison views, Region Edit selection, assigning/moving heights, selection cleanup, reversible edit groups. |
| Print finishing | Borders, Imprint, mesh detail and export. |
Choose any topic to start there, then jump to another through the lesson selector. The guide opens the relevant tab and collapsed sections; a lesson that needs Advanced controls enables their existing visibility preference. Workflow-specific controls may require you to choose that workflow or generate a current stack preview. Region Edit lessons explain how to open the editor without applying edits automatically. Experimental features remain opt-in.
The guide uses the current application fonts and theme. Its strong contrasting outline, halo and Look here label adapt to all seven theme choices, including Windows System's live light/dark appearance. Grape Escape uses lime and Sunset Circuit uses cyan; the other palettes use coral. Resizing or scrolling moves the guide with its target.
Tour navigation preserves your source, processing settings and completed result. Changing a real control still performs its normal action. The tour does not replace your artwork, generate previews, apply edits, save files, export or send automatically. Click Send to HueForge yourself when ready; Next and Finish never start a transfer.
Find your way around
The top bar contains File, the current document name, All tools, Print readiness, Preferences, Export, and the HueForge send controls. All tools searches for a tool and takes you to the relevant part of the workspace. In a smaller window, Print readiness uses its clipboard icon; its label remains available in the tooltip and File menu.
The four steps are navigation, not a checklist you must complete in order:
| Step | Purpose | Common tasks |
|---|---|---|
| Image | Choose the look | Workflow, color budget, smoothing, protected colors, color placement. |
| Filaments | Choose the collection and constraints | Library filters, required spools, base and final filament, library management. |
| Set physical behavior | Dimensions, heights, stack strategy, lighting, borders, Jigsaw, Imprint. | |
| Send & export | Continue the project elsewhere | Export formats, HFP settings, project companions, restoring an edited preview. |
Expand only the sections you need. Advanced reveals additional tuning without resetting the settings you already chose. The bottom overview provides a compact summary and opens Inspect layers or Result details. These larger views open separately so they do not consume the main canvas permanently.
The footer reports rendering and recovery status. Auto preview controls whether ordinary setting changes render after a short pause. With it off, several changes can be made before Refresh preview. Cancel stops the current render. A result labeled Previous is retained for reference while settings differ or another render is running.
Built-in help
Choose the ? Help icon, File -> Help & user guide, or press F1 to read the bundled guide and FAQ offline. Search guide finds relevant topics. Save PDF guide writes a copy you can read or distribute separately. Close the window or press Escape to return to the project. The help window does not change the open project.
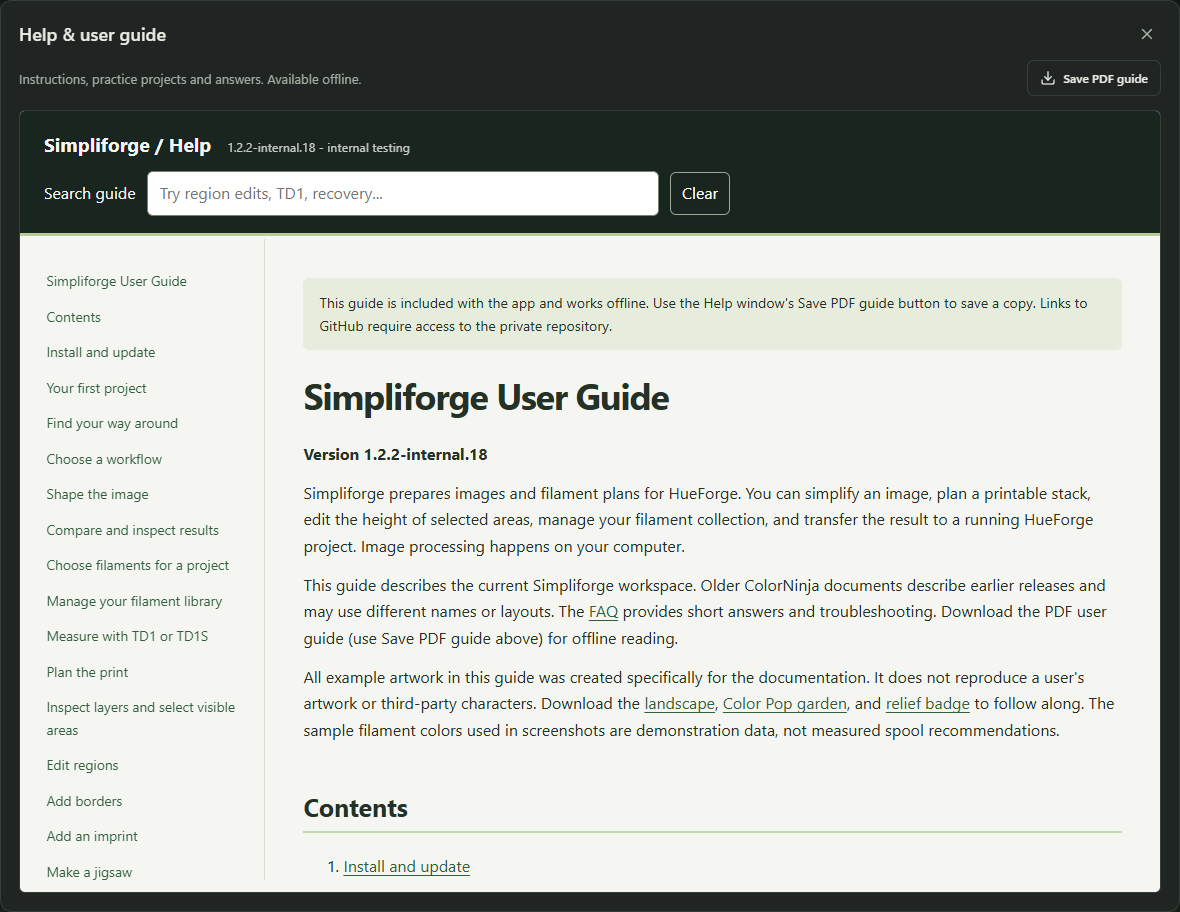
The same guide is available in the application, Markdown, and PDF.
Choose a workflow
| Workflow | Use it for | What the budget counts |
|---|---|---|
| Color Match | One ordered filament plan with printable heights | Unique filaments, not every resulting blended color. |
| Litho (experimental) | A flat print viewed with a light behind it | Unique filaments; Single filament uses one spool. |
| Hidden Litho (experimental) | One flat print with different front-lit and backlit images | Unique filaments shared by both viewing conditions. |
| Color Pop | Selected color against grayscale, optionally with a stack | Prepared colors or stack filaments, depending on output. |
| Filament Guide | A PNG guided toward your filament colors | Eligible filament references. |
| Simple reducer | A smaller image palette without a library | Total output colors in new desktop settings. |
The information button beside the workflow explains the selected mode. Changing modes retains relevant tuning. Saved projects restore their own workflow; new images start with your saved defaults unless Retain settings for new images is enabled. Experimental workflows and tools appear only when Preferences -> Show experimental features is on; this preference is off by default.
Color Match
Color Match predicts colors reachable through successive filament layers. It chooses filaments, their order, and layer allocation within the limits you provide. Different heights can use blends of the same filaments, so an eight-filament plan can show more than eight visible colors.
Use this workflow when you want Simpliforge to prepare the layer plan. Inspect both the front-view colors and the height structure: a good flat color match alone does not guarantee the relief you want. Software predictions depend on accurate filament color, TD, and lighting information; compare a small physical print before committing to a large project.
Litho (experimental)
Enable Preferences -> Show experimental features, then choose Litho (Backlit) · Experimental for a flat backlit print. Use Load Litho demo, or open your own image and select a filament library. If no library is selected, the sample supplies clearly labeled Practice only filaments with illustrative colors and TD values. Choose your own measured library before printing.
Use Color lithophane for a stack of several filaments, or Single filament for shading through one filament's thickness. Choose Balanced color and light, Brighter highlights, or Fewer filament changes, then set the physical layer heights, depth and filament budget. These are goals; inspect the result and actual swap count. Automatic foundation search stays between the minimum base depth and Maximum foundation thickness, within the total depth limit. A required base spool remains locked. Single filament trims unused top layers from its thickness/color curve; automatic total-depth selection applies to Color lithophane.
The main preview predicts the lit result. Use Unlit to inspect the same stack under front lighting. Light loss compares source and predicted luminance pixel by pixel: red marks a darker prediction and blue marks a brighter prediction. Foundation brightness, dynamic range and clipping are estimates within the selected optical model, not measurements of light transmission. Choose the light settings for your intended display and compare a small print under that light.
Compare results and Guided refinement -> Stack planning offer Litho goals while retaining light settings, foundation settings, required spools, endpoint locks and hard print limits. Applying a guided winner restores the exact reviewed result and diagnostics. Projects and recovery retain those results; presets and profiles retain reusable settings.
Litho keeps library colors and uses backlit optics. True Black, Color Pop and channel workflows do not apply. Existing flat finishing tools, including borders, Imprint, Region Edit and Jigsaw, remain available; inspect the updated heights and diagnostics. Curved panels and lightbox assemblies are not generated. Start with monochrome or related warm/cool colors. Arbitrary full-color photographs can exceed the colors reachable through one layered stack. The model does not establish physical print accuracy.
Save a .simpliforge project, then use Send to HueForge or export an HFP. Inspect the native backlit preview and mesh before slicing. Older applications reject Litho project/profile versions rather than silently dropping their workflow.
Hidden Litho (experimental)
With Show experimental features enabled, choose Hidden Litho · Experimental for one flat print with a visible image under front lighting and a reveal image under backlighting. Open the visible source, choose the reveal image, and adjust its scale and offsets to align both targets. Select measured filaments and set the physical layer heights, maximum depth, and filament budget.
Compare Visible target, Reveal target, Predicted visible, and Predicted reveal. Both predictions use one shared filament order and geometry. Reveal priority balances the targets, and Maximum paired tonal steps limits their shared height choices. Save a project to retain both images, alignment, and the reviewed result. Export or send the shared plan to HueForge for native mesh and slicer inspection. Guided refinement does not support this paired workflow. See Hidden Litho for the complete procedure and limitations.
Color Pop
Color Pop keeps a chosen color range while making the remainder grayscale. Its controls appear only in this workflow.
- Choose Use existing image colors for artwork already containing color and grayscale, or Choose colors to keep for a full-color source.
- With selected colors, choose Pick from original and sample the desired hue. Add more samples if needed, up to eight.
- Adjust Similar hues. A wider range includes neighboring hues and lighter/darker shades throughout the image.
- Adjust Grayscale tolerance to treat faint color casts as gray.
- Inspect the Selection feature: white areas stay colored and dark areas become grayscale.
- Choose Prepare image for a PNG without a library, or Plan filament stack for printable height bands.
In a stack, Height for color divides the available range, Region order chooses color above grayscale or grayscale above color, and Boundary gap reserves transition layers. This is color-based selection, not object recognition: a red flower and a red roof can both remain colored.
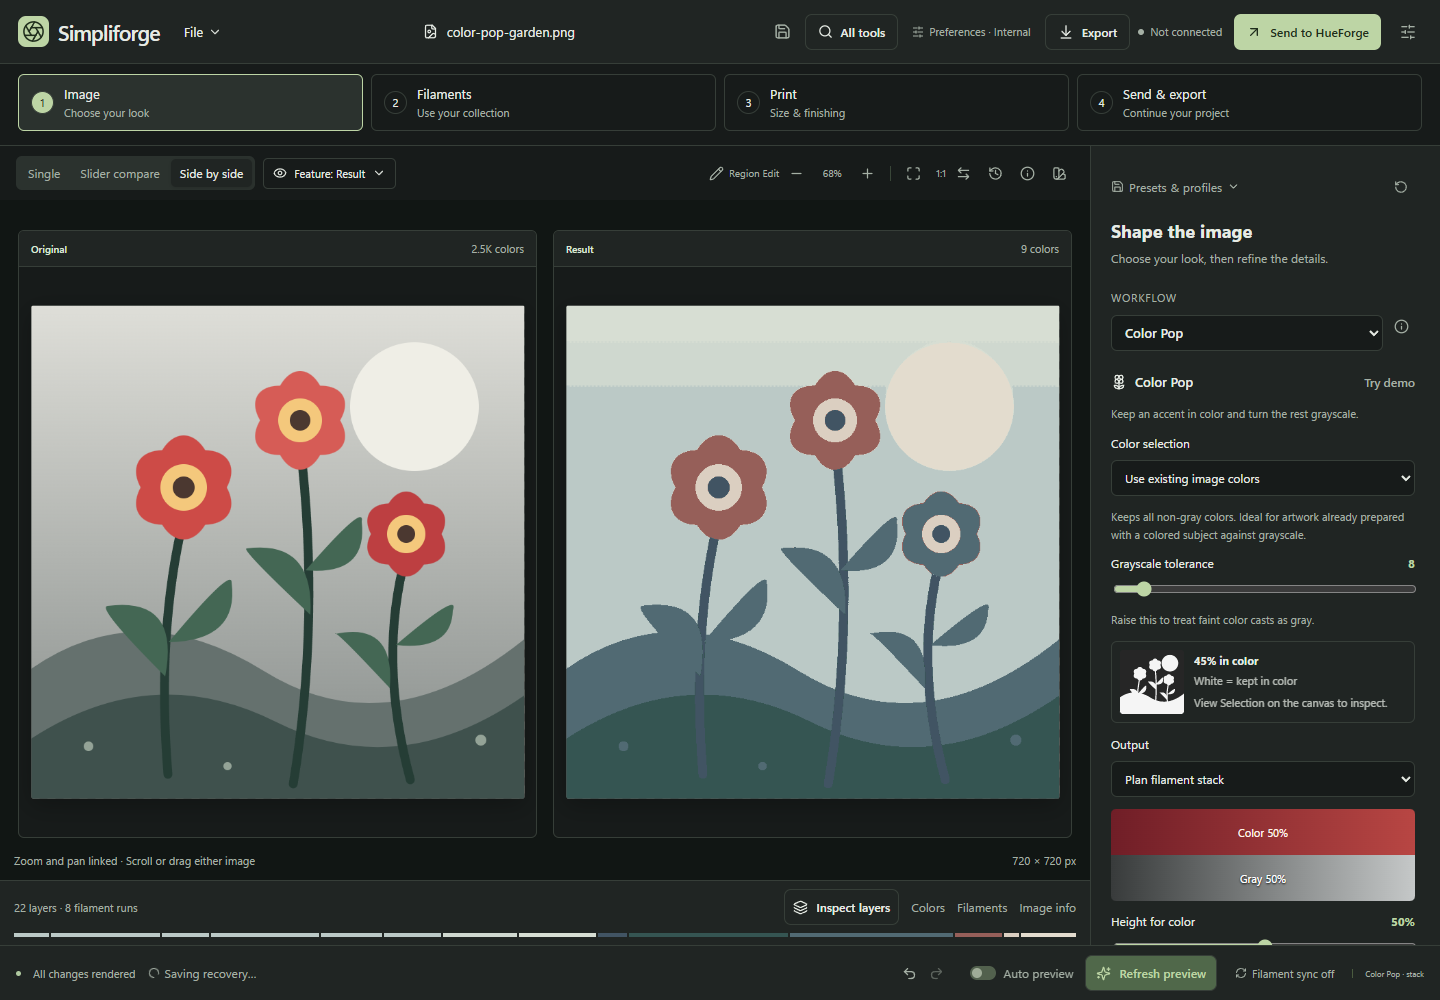
Sample the hues to retain, then inspect the selection before planning a stack. The colored selection applies throughout the image.
Filament Guide and Simple reducer
Filament Guide pulls reduced colors toward nominal filament colors and approximate blends. Filament guidance balances the source hues against those references. Different reference pairs do not necessarily fit one common printable stack. Use the prepared PNG to plan in HueForge, or switch to Color Match to test one common order.
Simple reducer makes a limited palette without dithering. New desktop settings count neutrals and chromatic colors together. Older projects can retain separate budgets; Advanced -> Color & detail controls exposes that choice. A maximum is a ceiling, so a simple image may use fewer colors.
Shape the image
Color budget and smoothing
Begin with the main budget slider. Increase it when important shapes merge; lower it when the result retains too many similar tones. In stack workflows, extra filaments can also mean more planning work and more spool changes.
All four smoothing presets remain available:
| Preset | Effect | Suitable starting point |
|---|---|---|
| Off | No detail smoothing | Already-clean artwork and deliberate pixel detail. |
| Gentle | Light texture reduction | Fine lines or subtle features. |
| Balanced | Moderate edge-aware smoothing | General images and photographs. |
| Strong | Stronger texture reduction | Noisy backgrounds; inspect softened detail afterward. |
Preserve details is independent of smoothing. It favors small coherent marks and consistent color groups, while retaining the same palette and filament limits. It cannot preserve every feature under an extremely small budget. Custom indicates smoothing values outside a preset.
Strengthen dark outlines
For cartoons, illustrations, or lettering with grayish outlines, enable Strengthen dark outlines below Preserve details. It detects existing thin, connected dark strokes using nearby contrast, then asks the color planner for a darker shade. It keeps stroke width and transparency; it does not draw new outlines or change filament TD measurements.
Outline strength starts at 60%. Increase it for darker detected strokes, or use 0% to inspect detection without darkening. Generate a preview and choose Feature -> Detected outlines to see the selected pixels, detected and changed counts, and any warning. Compare eyes, text, fine lines and shadows at 1:1: dark photographic details can resemble drawn strokes, and faint or broad lines may be missed.
In frontlit Color Match, Black layers requests the minimum black-filament thickness beneath detected outlines. The starting value is 2 layers; 0 leaves thickness to automatic color planning. A positive count requires an eligible dark neutral filament named Black. The planner must fit these layers within the existing depth, filament and run limits. A black filament's measured TD still controls its modeled opacity; two layers are not a universal opacity guarantee. Inspect the reported black run and final preview before exporting.
This option starts off and supports Simple reducer, Filament Guide and frontlit Color Match with the modern color pipeline. Color Pop, Litho, legacy processing and fixed-height workflows do not support it. Images are limited to 16,777,216 pixels. Projects retain the exact preview, detection report and settings; presets and profiles retain the settings. Older applications reject projects and profiles with this option enabled instead of dropping it.
Color priority
Overall balance favors area-weighted matching. Distinctive colors gives smaller accents and different hue families more influence. Vivid colors places more emphasis on colorful accents and hue accuracy; it does not increase image saturation. The same three choices apply wherever Color priority is shown.
Try Distinctive colors when a large background consumes the available palette. Inspect the actual result rather than assuming a lower error score or a brighter accent is always better.
Image refinement
Open Image -> Image refinement for optional color cleanup. These controls start off and are saved with projects, presets, and settings profiles.
Recover overlooked colors looks for coherent accents within the color budget. Check local detail can reject palette changes that lose detail or add artificial contour bands. Avoid artifact colors experimentally reduces the influence of suspected edge artifacts when choosing the palette. Inspect fine lines and small accents; compressed artwork can benefit from leaving this option off.
Simple reducer also offers Clean edge speckles for isolated near-edge artifacts and Flatten color patches (experimental) for larger mottled regions. Patch flattening merges similar-colored neighboring regions. Maximum patch area uses original-image pixels, and Patch color tolerance controls how different the replacement shade can be. Begin with the defaults, increase area first, then tolerance. It can remove intentional shading and small accents. Protected colors and transparency boundaries are retained, but every line or subtle feature is not guaranteed to survive.
Local detail checks evaluate palette selection before patch flattening. Compare the final preview before keeping it; saved projects and exported images retain the same flattened pixels. Edge cleanup and patch flattening support up to 16 million pixels and are inactive in Filament Guide and Color Match. All image-refinement controls are inactive in Color Pop and legacy compatibility processing. Palette artifact analysis and local checks use the selected analysis resolution and support up to 6,291,456 analysis pixels.
Protected colors
Expand Protected colors to see the selected swatches and hex values. Add a color by sampling the original, using the color picker, entering a hex value, choosing a result-palette swatch, or editing the comma-separated list. Shift-clicking a result palette swatch also protects it. Remove individual colors with their close buttons or use Clear colors.
In Simple reducer, protected colors reserve palette slots and count toward the budget. In filament workflows, they prioritize source colors within the available blends; they do not guarantee an exact spool or physical RGB match. The displayed count shows the permitted limit. Protect a few meaningful colors instead of the entire image.
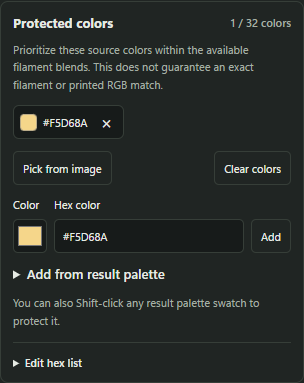
Each protected color remains visible as a swatch and hex value. Add from the source, a palette color, the picker, or the hex field.
Color placement
After a Color Match preview, expand Color placement. Drag source color groups, or use their arrow buttons, to prefer a Base -> top order. Order strength adjusts its influence. Reset order returns to automatic placement.
This preference concerns broad color groups. It does not independently move an object that shares colors elsewhere. Use Region Edit when a specific area needs a particular height. Custom color placement and automatic layer-order preference are alternative ways to influence order. Color placement changes request a new calculation even when Auto preview is off.
Advanced image controls
The exact budget, guidance strength, output color limit, smoothing radius/tolerance, neutral threshold, minimum cluster, histogram precision, clustering iterations, and analysis resolution are available under Color & detail controls, as relevant to the workflow.
Use the defaults until a specific problem calls for a change. Analysis resolution affects how colors are studied; mapping and ordinary PNG export still use the original pixels. Every source pixel can cost considerably more time and memory. The output color limit is separate from the unique-filament budget in stack planning.
Source image support
Open PNG, JPEG, WebP, GIF, TIFF, or BMP. Animated GIF/WebP uses the first frame. Orientation is applied and supported color profiles are converted to sRGB. Convert an unsupported profile to sRGB before importing. Processing uses 8-bit RGBA, so HDR/16-bit photographic precision is not retained. Inputs are limited to 100 megapixels and 512 MB encoded size; individual editing/export features can have lower limits. PNG retains image transparency and original dimensions, with available DPI metadata.
Compare and inspect results
Layout and Feature serve different purposes. Layout determines how panes are arranged. Feature determines what information is displayed.
- Single gives the selected feature the full canvas.
- Slider compare uses a movable divider between the original and preview.
- Side by side shows linked panes and is the default for new sessions.
- Preview history shows Original -> Last Preview -> Current Preview in linked panes for quick before-and-after checks.
- Feature offers the relevant Original, Result, layer-map, Color Pop Selection, Detected outlines, Frame, or Puzzle views.
Zoom with the wheel or buttons, pan by dragging, and use Fit or 1:1 to return to a known scale. Side-by-side panes share zoom and pan. Swap original and preview panes reverses their positions. Its two-arrow icon is distinct from the history-style Compare saved results icon.
Preview history retains the previous successfully completed preview of the same image in the current session. Unfinished or failed previews do not replace it. Opening another image or reopening a project clears Last Preview; the layout can be remembered without retaining historical images. Single, Slider compare and Side by side keep their usual Feature choices.
Choose Restore last settings above Last Preview to restore its processing options and filament filters, then generate a fresh current result even when Auto preview is off. Wait for that result before exporting or sending. Restore requires the same source and unchanged filament inventory. If either result contains Region Edit groups, settings alone cannot restore those edits and the button is disabled; use Region Edit Undo/Redo for edit changes instead.
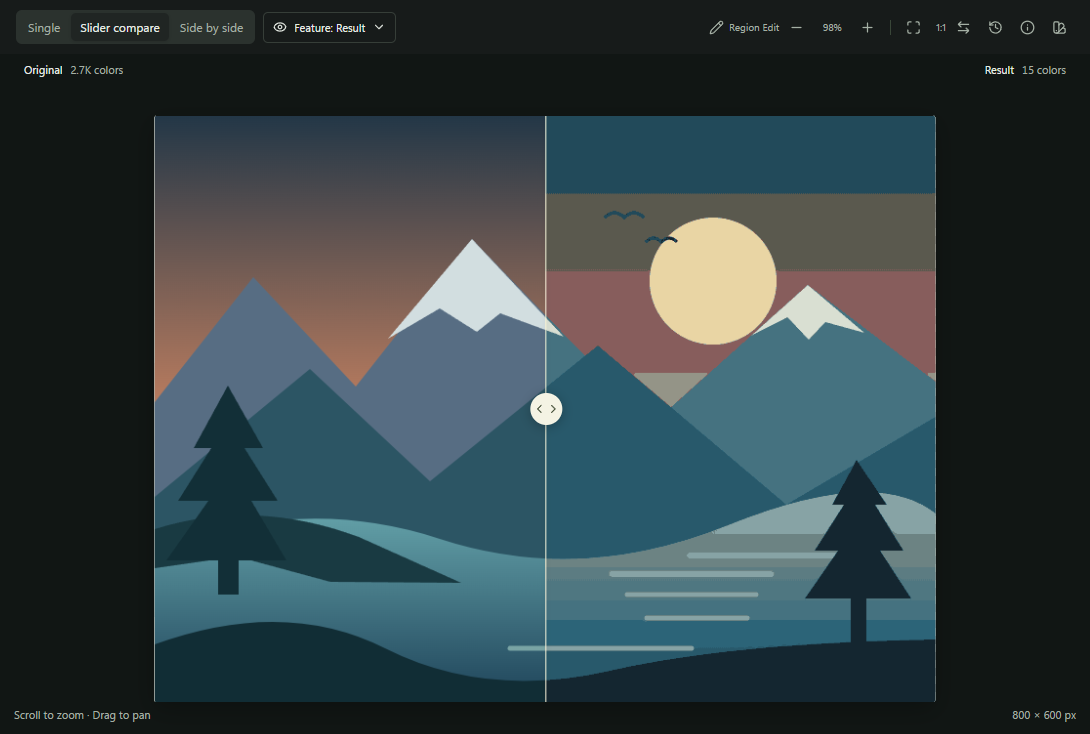
Use layout for presentation and feature for the information being examined. Compare Results stores alternatives separately from the source/result divider.
Compare results can save the current comparison and find stack alternatives. Cards show a thumbnail, color error, filaments/swaps, depth, boundary step, and estimated solid volume where available. Use these settings applies a candidate to the current image and library; inspect its refreshed result. Saved comparison thumbnails persist, but they are not portable project backups.
Result details contains palette colors, coverage, filament identity, image information, processing time, and quality information. Click a palette hex to copy it. Counts use visible full-resolution RGB colors; transparency and unused palette entries do not inflate the count. Layer maps and mesh previews can be sampled for display, so do not judge one-pixel edits solely from a zoomed sampled view.
Restore a previous preview version
Choose Preview versions in the image toolbar or File -> Preview versions to see every accepted, completed preview for the current image session. This gallery is available in every workflow. Newest versions appear first, with a small thumbnail, completion time, color count, workflow, and print depth where available. Failed, canceled, or unfinished previews do not become versions.
To compare your own completed previews, check Compare version on two cards and choose Compare selected (2/2). The comparison loads their full-resolution result images side by side. Scroll over either image to zoom both, drag to pan both, and use Fit / reset or double-click to return to Fit. Linked zoom also offers fixed zoom levels. The settings-differences table helps identify what changed. Back to versions returns to the gallery; Clear selection lets you choose another pair. Comparing does not generate or restore a result.
Choose Restore on a version to bring back its exact result, processing settings, filament filters, and Region Edit groups. The result is restored directly with a fresh validated preview identity; it does not have to be processed again, even when Auto preview is off. Preferences and the current viewer layout stay as they are. Restoring does not add a duplicate version. You can also restore the current version to discard unapplied settings changes.
The source image and filament inventory must still match the captured version. Finish active operations before restoring. Versions use small thumbnails and temporary snapshots on disk to keep the gallery compact; they clear when you open another image or project, or close the application normally. Save a Simpliforge project to keep a result and its editable groups beyond this temporary session.
Choose filaments for a project
For a non-destructive alternative, open Result details -> Filaments and use Compare without beside a spool. Simpliforge evaluates alternatives without that spool and opens the comparison results; review them before applying one.
Open Filaments and select a library. Simpliforge remembers your choice and can detect common HueForge library locations when none is selected. The selected path and eligible-entry count help distinguish a missing library from a library whose filters exclude every row.
Choose Use HueForge library beside Change library to find and load HueForge's current personal filament library on Windows or macOS. This also switches back after selecting another library and reloads the file when it is already selected. If automatic discovery cannot find the file, your current library stays selected; use Change library to select HueForge's library manually.
Library filters control ownership, materials, secondary-color eligibility, and silk/metallic finishes. Search helps find entries without changing the saved records. An unknown TD of zero cannot be used for stack planning. The optional silk/metallic filter also covers related finish names; a color called gold or silver alone is not automatically treated as metallic.
Filament brand limits eligible spools to one or more checked brands. Open the dropdown and type part of a brand name, such as Bambu, or use * and ? as wildcards. Select matching brands checks the visible matches; checked brands stay selected when you change the search. Choose Apply brands to update the project. Clear selection, followed by Apply brands, returns to All brands. Cancel or Escape keeps the previous selection. The other library filters still apply, and a failed change keeps your current eligible spools.
The base and highlight/final selectors can be searched by brand, color name, material, or TD.
Save filament palettes
In Filaments, choose Manage palettes to create a named combination from your library. Search the library list, check the spools to include, and arrange the color strip with the arrow buttons. Choose Save and use palette to save the combination and apply it. The strip's order is a visual reference; the planner still determines the print's layer order.
Use filament palette restricts matching and planning to the selected combination. The searchable Filament palette dropdown shows each saved palette with a color strip. Ownership, material, brand, finish filters, and project exclusions still apply. A palette makes its spools available; it does not require every included color to appear. Use Required spools when that is needed. Missing spools are reported and never replaced with unrelated inventory.
Palettes are saved on this computer. Projects and settings profiles also retain their selected palette, so a project can keep using its copy after the local saved palette changes or is deleted. The picker labels that snapshot Project copy. Save it through Manage palettes to add it to your local collection. Palette synchronization with HueForge is reserved for future support; the current HueForge SDK does not provide it.
Use true black models eligible dark neutral filaments named Black as #000000. It does not edit their library color or TD. Turn it off when comparing the original measured values.
Under Required spools & stack ends, require specific spools, set a Base filament, or set a Highlight / final filament. They still count toward the filament budget. If the constraints cannot fit that budget, change the budget or clear a constraint. The highlight-only-final-run option in Print prevents an earlier return of that selected highlight filament.
The base and highlight/final selectors show a small color swatch beside each listed filament and the current selection. The swatch uses that filament's library color to help find a spool quickly. It is not a prediction of the final layered print color; review the spool name and measured data before choosing.
Exclude a spool from this project
In Inspect layers, right-click a filament run or open the selected filament's menu, then choose Exclude from this project. Every run using that spool becomes ineligible for the next plan, and conflicting base/final/required assignments are cleared.
Review Excluded filaments from the inspector or Filaments step to restore one or all. Exclusion changes the next plan, not the library record. Save the project to retain exclusions. New images and different libraries clear individual exclusions. Existing Region Edit groups must be reset before changing the underlying spool plan; save a copy first if you want to keep both versions.
Manage your filament library
Choose Filament library from File, the Filaments step, or All tools. The management window keeps My library, Import profiles, and TD1 / TD1S together. Project filters remain in the main sidebar.
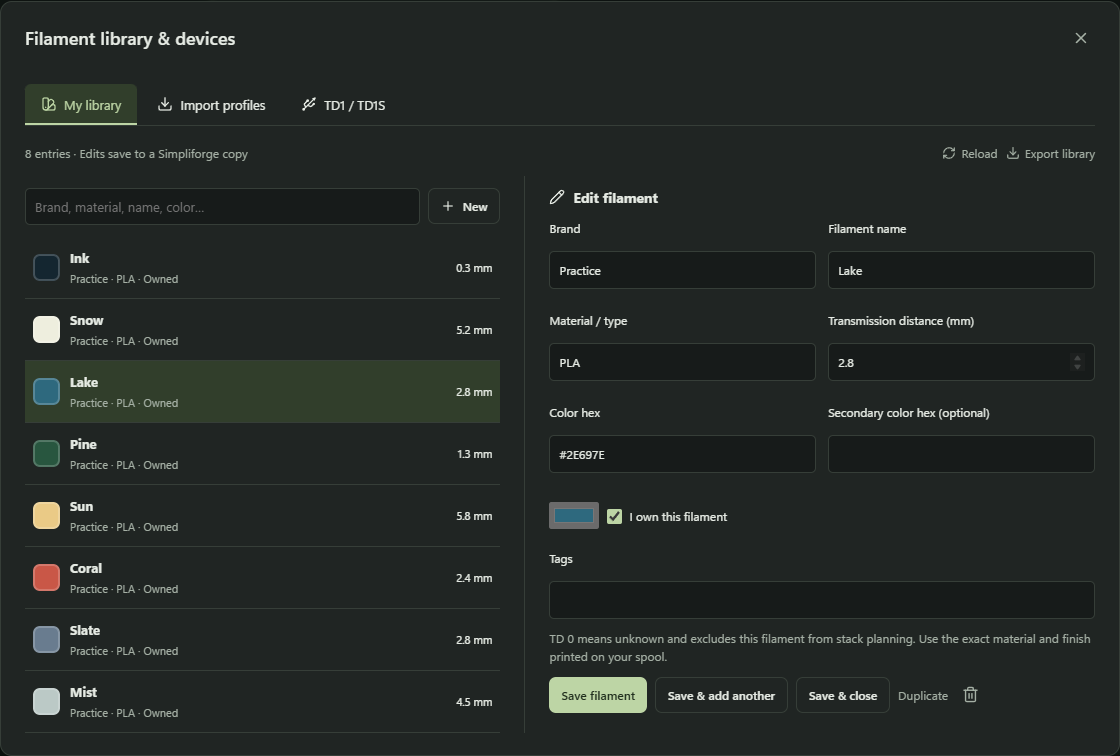
My library shows color swatches and editable hex values. Demonstration entries are not measured filament recommendations.
Add, edit, and duplicate
- Choose New, select an existing row, or use Duplicate.
- Enter brand, filament name, material/type, TD in millimeters, color hex, optional secondary color, ownership, and tags.
- Review the visible color swatch. Use a full six-digit RGB value such as
#397D79. - Choose Save filament, Save & add another, or Save & close.
Save & add another keeps useful repeated fields such as brand and material. Zero TD means unknown, not completely opaque. Unsupported or invalid rows remain visible in management but may be excluded from planning and synchronization.
The first edit of an external library creates a managed Simpliforge copy rather than overwriting that source. Later edits make backups. Unknown fields are preserved where supported, and simultaneous file changes require Reload before saving. Export library creates a separate HueForge-compatible JSON file. Library edits invalidate affected previews so refreshed plans use the new data.
Unsaved editor values survive movement between management tabs. Closing asks before discarding them, and Recover library edits can restore recoverable drafts. A restored draft still needs review and Save.
Import profile information
The Import profiles tab accepts copied profile text, saved HTML, and CSV from 3D Filament Profiles. It does not automatically search the site or upload your measurements.
- Use Open 3D Filament Profiles and find the spool's detail page in your browser.
- Copy the page text and enter its URL or ID in Simpliforge.
- Choose Read copied profile, or import a saved HTML/CSV file.
- Select Use profile, review every field, and save the filament.
CSV may include Brand, Material, Type, Color, RGB, TD, and Filament ID. A profile without TD remains unknown until you enter or measure it. The imported-record filter searches the local imported list. A profile describes a reported filament; your own TD measurement may differ.
Measure with TD1 or TD1S
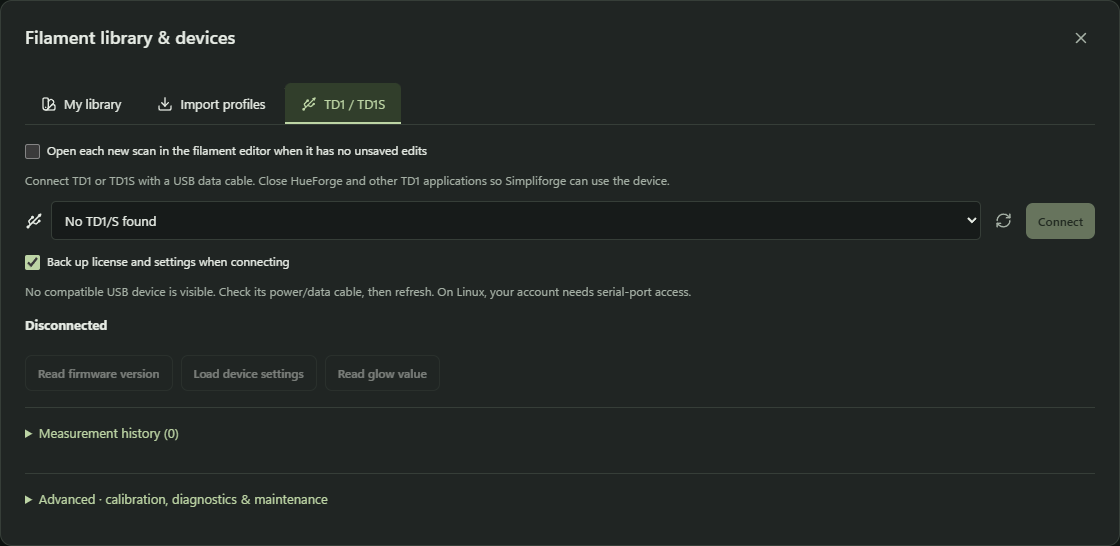
Device controls depend on the attached firmware. An empty device list is a connection state, not a sample measurement.
Record a measurement
- Connect the device with a USB data cable. Close another application if it holds that serial port.
- Open Filament library -> TD1 / TD1S, refresh the device list, and choose Connect.
- Confirm the device identity. Simpliforge normally backs up its settings and license when connecting.
- Insert filament and follow the device display. Review the latest TD, color, and timestamp.
- Use Use TD for… to update the selected editor, or Add as new filament.
- Leave Also replace filament color off to retain an imported color and change only TD. Review and save the filament.
The saved measurement retains its device and timestamp, with previous TD history. The connected-session reading history can be exported as CSV, and diagnostic messages can be exported separately. Optional automatic opening of a new scan respects unsaved editor changes; it does not silently save the filament.
Settings, calibration, and maintenance
Load device settings displays the controls the firmware supports, such as display orientation, scanning, timing, sensors, and color display. Only supported changed values are sent. Saving device settings restarts the device; reconnect afterward.
Advanced device tools include empty-lux and color calibration, RGB fine tuning, error logs, device backups and restore, firmware checks, license installation, and bootloader/recovery tools. Follow the device manufacturer's calibration instructions and the prompts for your device. Empty-lux calibration requires an empty filament path.
A firmware operation is an explicit action, separate from application updates. Review the package and prerequisites, make a device backup, keep the USB connection stable, and reconnect to verify the reported firmware version. Transfer acknowledgment alone does not prove an update completed. Restore uses a matching, intact device backup.
UF2 recovery requires the device/backup checks shown in the application and careful selection of the correct bootloader drive. That drive does not identify itself by the TD1 serial. If the device cannot be connected, identified, and backed up through the supported workflow, use the manufacturer's recovery procedure. On Linux, serial-device permissions may need adjustment by the machine's administrator.
Plan the print
Set physical dimensions and layer heights before detailed Region Edit work. Some geometry-aware settings affect the generated plan, even when they appear to be export dimensions.
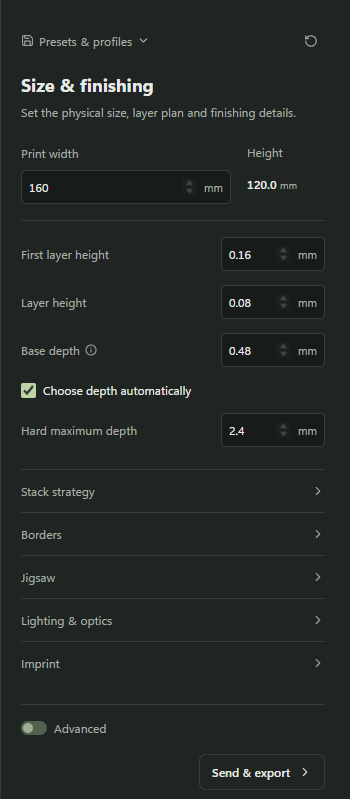
Set the actual print geometry, then choose how the planner balances appearance, depth, and spool changes.
Size and layer heights
Print width determines physical width; height follows the image proportions. First layer height, Layer height, and Base depth must match the intended print. Layer numbers are one-based:
Height at layer N = first layer height + (N - 1) × regular layer height
For a 0.16 mm first layer and 0.08 mm regular layers, layer 5 is 0.48 mm and layer 22 is 1.84 mm. Base and manual depth entries snap to printable heights when committed. An automatic maximum is a hard ceiling and rounds down when it falls between printable layers.
Stack strategy
Fresh Color Match settings enable automatic depth, layer-order optimization, show-through reduction, and filament returns. Previously saved explicit settings are retained.
- Choose depth automatically compares eligible depths below the hard maximum and prefers a thinner candidate within its allowed score tolerance. The maximum includes the base.
- Reduce layer show-through considers unwanted intermediate colors at boundaries. Cleaner boundaries can involve a color-fit tradeoff.
- Optimize layer order favors suitable accents above surrounding colors. It is a heuristic, not foreground-object recognition or a rule that black must always be lowest.
- Allow filament returns permits a spool to appear again after another spool. Eight unique filaments can occupy more than eight runs.
- Maximum filament runs caps continuous uses. A black-yellow-black schedule has two unique filaments and three runs.
- Swap quality allowance controls how much modeled quality may change while simplifying the schedule. At zero, simplification must preserve or improve its checked scores.
- Search effort chooses Normal preview or Deeper refinement. Deeper explores more arrangements and takes longer; every individual metric need not improve.
Advanced exposes color-score and automatic-depth allowances. These are planning-score tolerances, not percentages of guaranteed perceived print quality. Use Compare results to judge the actual tradeoff. Estimated solid volume excludes slicer behavior, extrusion settings, and purge waste.
Reduce surface spikes
Enable Advanced in Print, then open Surface cleanup -> Reduce surface spikes. This optional control starts off and is independent of Show experimental features. An enabled saved setting stays visible and editable when Advanced is off. It looks for small, isolated high regions in a frontlit Color Match height map and can lower them to a nearby usable shade already present in the planned stack. It does not add a filament, change measured TD or resize the source.
Spike reduction strength starts at 50%. Higher values allow more cleanup and a larger color tradeoff; 0% inspects candidates without changing pixels or heights. Maximum spike area starts at 16 pixels and accepts 1-256. Area is measured in original source pixels, so a setting has a different physical footprint when image resolution or print width changes.
After generating a preview, review Candidate regions, Reduced regions and Changed pixels beside the controls. Open Image info for Maximum lowering. Inspect the final image and layer view at the intended print scale. Edge and thin-detail guards aim to preserve linework, but they cannot identify every intentional feature. A small eye highlight, whisker or texture mark can resemble a spike; some genuine spikes can remain. This is not a general micro-detail remover.
The option supports modern frontlit Color Match and up to 16,777,216 source pixels. Other workflows are unsupported. Projects and recovery retain the exact preview, heights and report; presets, profiles and defaults retain the controls. Older readers reject enabled cleanup. Controlled synthetic tests do not establish improvement on complex artwork or physical prints.
Lighting and optics
Choose HueForge Front Lit, HueForge Backlit, or the legacy approximation where available. Match the light preset and, for Backlit, the relevant intensity/TD scale when comparing with HueForge. The prediction does not simulate every surface finish or real lighting condition. Optical calibration notes and sensitivity controls help record and evaluate your assumptions; they do not replace a measured spool and test print.
For faster iteration, reduce analysis resolution, begin with Normal preview, and turn Auto preview off while entering several changes. Larger sources, deeper ceilings, more candidates, and more complex geometry increase work. Do not change the physical scale simply to make a final render faster without reviewing the resulting plan.
Inspect layers and select visible areas
Open Inspect layers from the bottom overview. The inspector shows the physical filament runs, predicted layer colors, matching targets, and an interactive surface. Select a layer to see its height, filament identity, and image coverage.
The sampled surface offers Surface, Boundaries, Color transitions, Selected layer, and Coverage. Orange boundaries mark height changes; pink transitions mark intermediate colors different from surrounding vertices. These are inspection aids, not measured print defects. Click the surface or use the layer selector to inspect a height. Measurements & method explains sampling and boundary statistics; measurements describe the complete plan even when inspection layers are hidden.
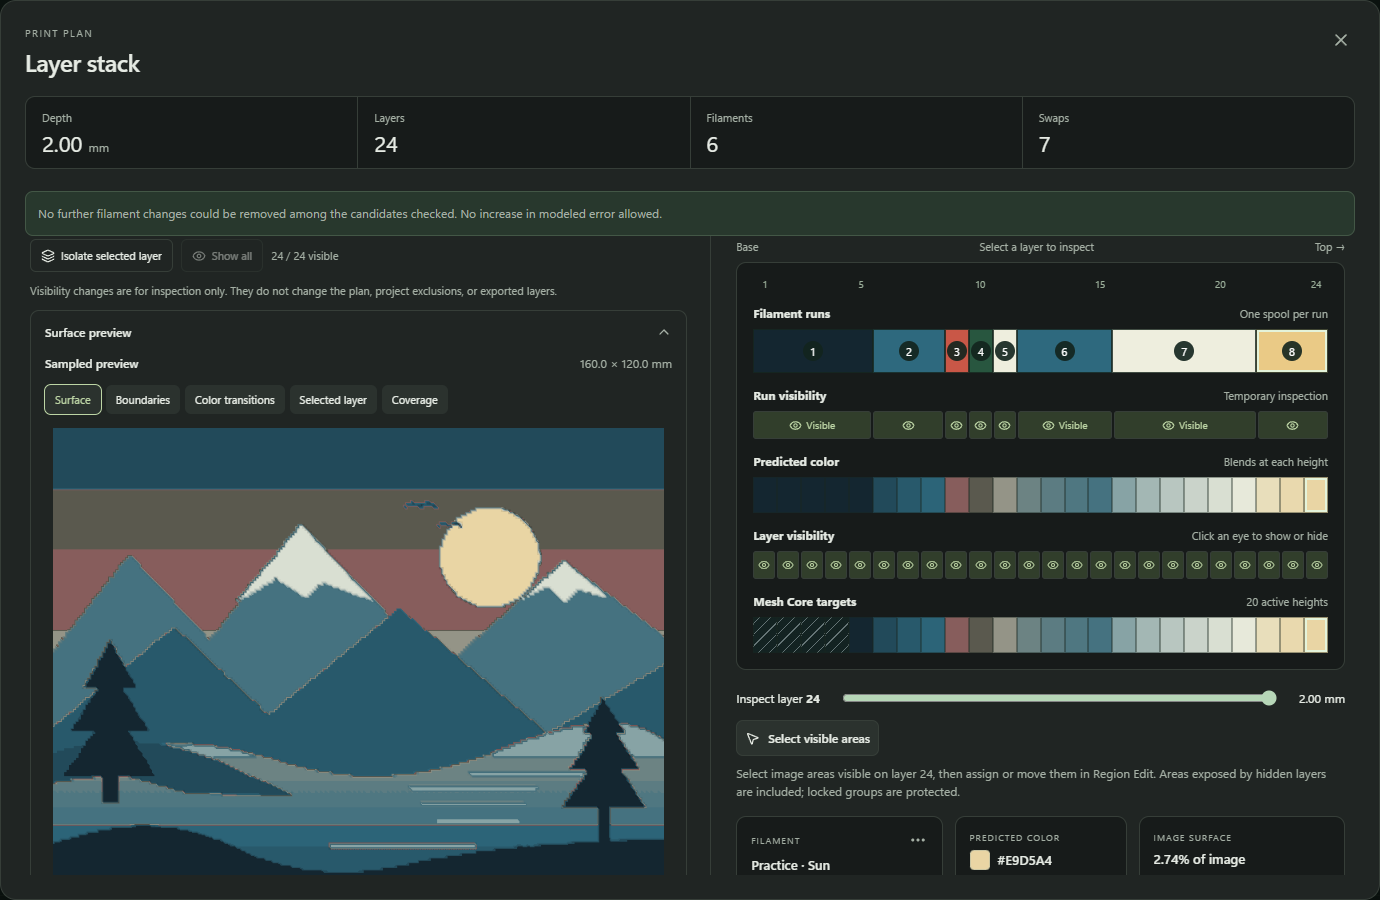
Physical filament layers, matching targets, and temporary visibility are separate controls and concepts.
Show, hide, and isolate
Hide individual layers or runs, isolate a layer, and use Show all to restore the view. This visibility is temporary inspection state. It does not delete physical layers, change TD values, or alter exports. Exposed surfaces use the existing predicted colors; hiding layers does not recalculate optical blends as if you had removed material from the print.
Striped or crossed matching targets are different: they exclude heights from image matching in the exported Mesh Core. Physical layers can still print underneath higher surfaces. Border-only heights can legitimately be excluded as image targets.
Ordinary Color Match normally uses Tuned image colors, which adjusts virtual Mesh Core TD values while leaving the real filament TDs intact. Current region-edited, Color Pop, Imprint, Backlit, and other exact-height export paths can use the older flat 0.01 TD mapping with unused matching heights disabled. That exception remains in this version. Do not read a matching cross as removal of a physical filament layer, or edit your real spool measurements to imitate virtual Mesh Core values.
Select everything visible on a layer
- Select the desired layer in Inspect layers.
- Set the inspector visibility to expose the areas you intend to edit.
- Choose Select visible areas. Region Edit opens with the corresponding editable pixels selected, including disconnected islands.
- Choose Assign to layer and Assign layer to put them all at one height, or use Move layers to shift them relative to their current heights.
- Inspect the result, undo if needed, and choose Done. Save the project to retain the edit groups.
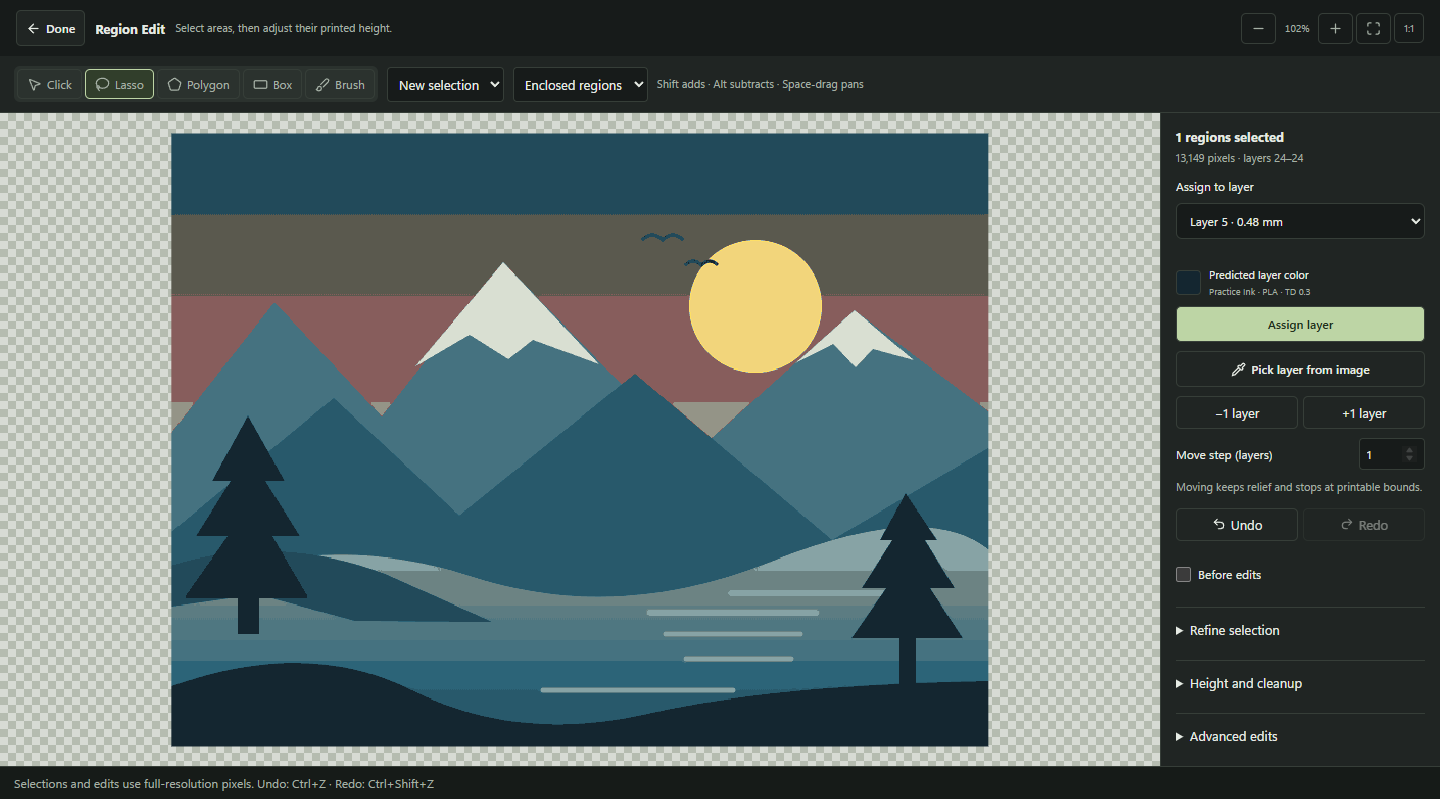
Selection creates an editable footprint. It becomes a real height change only when an assignment or movement is applied.
With all layers shown, this selects the chosen layer's visible surface. Hiding higher layers includes areas exposed on the lower layer. Isolation can select that layer's physical footprint. A hidden target layer must be shown first. Original transparency, cutouts, and protected groups are excluded; generated borders outside the artwork remain controlled by Borders.
Selection uses full-resolution image heights, not extra pixels suggested by sampled mesh shading. This is a convenient entry into Region Edit, not a command to remove a spool or rebuild the entire stack.
Edit regions
Region Edit is available after generating a filament-stack preview. Its canvas and independently scrolling tools replace the ordinary sidebar until Done. It changes local heights within the existing stack; it does not choose a new filament order or add depth above that stack.
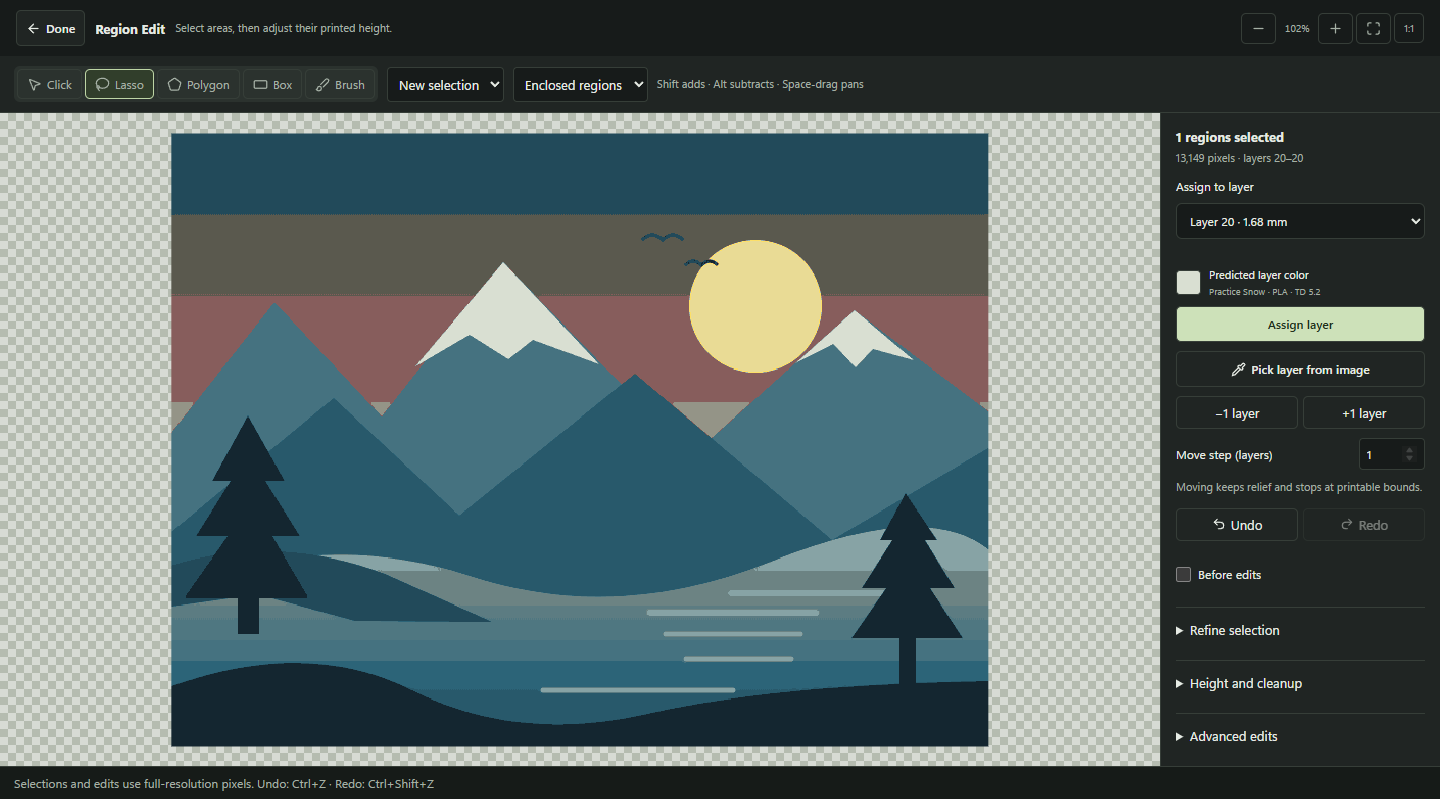
The highlighted selection is the footprint that the next operation will affect. Review the target layer's height and predicted color before applying it.
Select areas
Click selects a connected height region. Lasso, Polygon, Box, and Brush select drawn areas. Polygon finishes with Finish polygon or Enter; Escape cancels an unfinished gesture. Brush radius is measured in source pixels.
For drawn shapes, choose Enclosed regions for complete regions fully contained inside, Touching regions for complete regions touched by the shape, or Pixels inside to cut a selection boundary through a region. New selection replaces the previous one; Add, Subtract, and Intersect combine it. Shift adds and Alt subtracts during applicable gestures.
Diagonal contact alone does not join regions. Original transparent pixels are excluded. The selected region and pixel counts help verify the scope before editing.
Assign, move, and clean up
Assign layer makes all selected editable pixels end at one chosen layer. Move layers raises or lowers them by the entered number, preserving relative relief until the stack limits clamp it. Pick layer from image samples an existing target.
Refine selection provides clear, all, invert, grow, shrink, fill selection holes, same-layer selection, similar-color selection, and small-region selection. Selection refinement changes the footprint; it does not fill original transparent holes.
Height and cleanup can flatten to the most common, highest, or lowest selected layer; match surrounding height; or smooth selected heights. Smoothing can soften important detail, so compare and use Undo if necessary. Restore generated heights returns selected pixels to the original plan. Cut hole explicitly removes the selected coverage through the base and requires confirmation. Ordinary lowering preserves the base.
Groups, protection, and history
Applied operations create groups. Rename groups, reselect their footprints, enable or disable them, protect them, delete them, or split supported footprints into disconnected islands. Later enabled groups apply after earlier ones. An enabled protected group prevents later operations from changing its pixels until unlocked.
Before edits temporarily displays the generated baseline and disables editing. Undo/Redo covers selections and operations. Saved projects retain the baseline and groups; reopening starts a new undo history. Keep the project for full group editing even after exporting an HFP.
When changed settings block export
Changing the source plan under existing groups can make their layer assignments invalid. Simpliforge prevents that replacement. If you see this result has region edits, choose Restore edited preview settings to recover the settings and saved library that produced the edited result. Your edited heights and groups remain.
If you intentionally want a different stack, save a separate project first, then use Reset edits and regenerate. Some width or geometry changes require replanning, so set those before detailed edits. Pure inspection visibility does not trigger this reset requirement.
The editor supports images up to 100 megapixels in total, including images wider or taller than 4096 pixels, with up to 1,024 groups. Selections and saved edits retain full source resolution; the displayed selection overlay is scaled for responsiveness. Footprint complexity and history memory remain bounded, so a complex document can reach those limits before the group limit. History retains up to 40 actions within its memory budget. Use Cancel processing to stop a long operation and keep the previous selection and edits. If a complex stroke exceeds its limit, use smaller selections or shorter strokes.
Add borders
Open Print -> Borders, enable Add a border, and choose placement, sides, width, roundness, and depth. Inspect the Frame feature after refreshing.
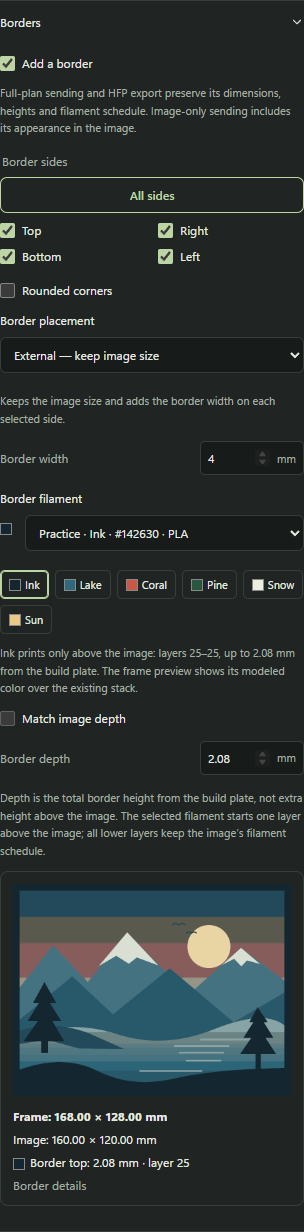
Border filament selects a real spool already present in the image's stack. Depth is measured from the build plate.
An External border adds around the existing image size. An Internal border scales the image proportionally to make space; it does not simply crop the source. Individual side selections and rounded corners change the final outline. The source image remains available for editing.
Choose Border filament from the spools already used in the plan to print a border-only run above the image. If the image ends at layer 22 and the border is 4.0 mm high, a 0.16 mm first layer with 0.08 mm regular layers puts the selected filament on layers 23 through 49. The 4.0 mm is total height, not an extra 4.0 mm above the image.
Selecting a different final filament adds a swap; continuing the last spool may not. An explicit border filament requires height above the image. Follow image stack keeps the existing stack-derived color, and Match image depth follows the image top. The image's maximum depth does not cap an explicitly taller border.
If a new image plan no longer uses the selected border filament, Simpliforge switches that selection to Follow image stack and reports the change. The border depth and other frame settings are retained. Review the frame after refreshing. If the selected filament is still available but its border depth is too short, correct the reported depth error before retrying.
Square, all-sides HFP/full-plan borders retain HueForge's native border controls. Rounded or selected-side frames are baked into the exported geometry; edit them in Simpliforge and export again. Image-only transfers contain a picture of the frame, not its planned physical border depth. A frame does not automatically connect detached transparent artwork or fill holes: review attachment and strength in HueForge and the slicer.
Add an imprint
Open Print -> Imprint, import your own logo or the original relief badge, and position it over the artwork. Transparent PNGs work well for silhouettes. Dark/light selection, threshold, and outline choices control which parts form the mark.
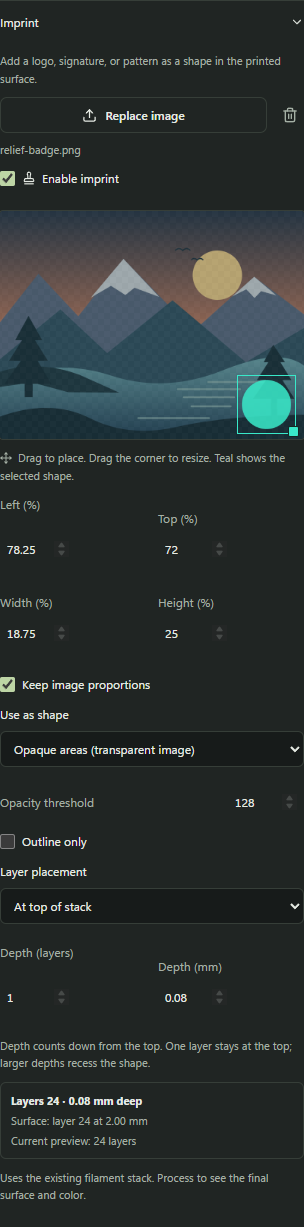
Position and size remain editable. Its printed color comes from the existing stack at the chosen height.
Drag to position and use a corner to resize, or enter percentages. Lock the aspect ratio to retain proportions. Base, Top, and Custom layer finish affected pixels at a specified layer; Follow surface recesses each point relative to its existing height.
For Top placement, one layer uses the existing top layer; increasing depth recesses the mark. For Custom layer, starting at layer 5 with depth 3 ends at layer 7. Follow surface by two regular 0.08 mm layers recesses 0.16 mm, stopping at the first layer in thin areas.
An imprint can raise low surfaces or lower tall ones to its target. It does not create hidden underside cavities. Transparent artwork remains empty. Review the result and height map at a suitable detail setting. Projects, presets, and profiles embed the imprint image and placement. Reset existing region groups before changing the imprint underneath them.
Make a jigsaw
Open Print -> Jigsaw and enable Turn print into a jigsaw. Choose Standard or Complex, target piece count or physical piece size, shape variation, and gap. Refresh and inspect Puzzle. New pattern changes the seed; an ordinary refresh preserves it.
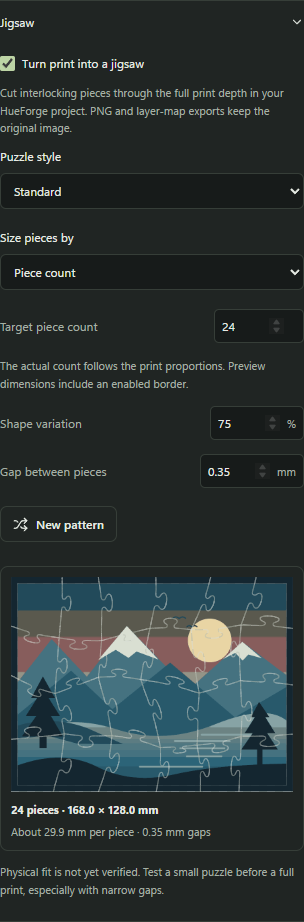
The pattern covers the full print, including enabled borders. Cuts pass through the base.
Standard retains recognizable rows with varied edges. Complex uses more irregular layouts. The actual piece count can differ from the target. Start with a modest count and review all narrow pieces. The initial 0.35 mm gap is a starting value, not a fit guarantee for every printer or material.
Use full-plan Send to HueForge or HFP to preserve the physical cuts. PNG and layer-map exports do not contain the Jigsaw cuts, and image-only sending is unavailable while Jigsaw is enabled. Keep imported transparency and mesh detail; changing them or adding a continuous native border can reconnect pieces.
Export rejects pieces that become disconnected or split. Transparent holes, narrow features, gaps, and rounded corners can cause this. Try fewer pieces, a different gap, or another pattern. Save the project to retain the seed and editable geometry. Jigsaw remains experimental: inspect the native mesh and slicer result and print a small fit test first.
Save projects and recover work
Save a portable project
File -> Save project creates a .simpliforge containing the normalized source image, settings, embedded filament library, completed result, and applicable region/border/imprint/Jigsaw data. Use Open project or drag the project into the window to reopen it without the original image and library files.
Save project (Ctrl+S) asks for a filename on the first save, then saves the current project under that name. Opening a project also makes its filename the current save target. File -> Save project as… (Ctrl+Shift+S) always opens a filename dialog, starting with the current project's name and folder, so you can create a separate version. After a successful Save As, later saves use the new filename. The workspace shows the current project name. Opening another source image starts a new unsaved project.
A project is the editable master. A PNG, palette report, or settings profile is not a replacement. The source image is not overwritten. Legacy .colorninja projects remain accepted; older JSON-only projects can still depend on external files.
Recent projects and images
File -> Recent projects remembers the last eight successfully opened or saved projects, with the newest first. It stays separate from Recent images and is retained when you restart the application. Choose an entry to reopen that file. If it was moved or deleted, use Open project to find its current location. A recent entry is a shortcut, not a backup.
Recovery after closing or a crash
Simpliforge keeps a separate local recovery checkpoint. On reopening normally, it restores the last workspace, including completed previews and applied region edits, with unrendered settings retained. Normal closing waits for the latest checkpoint. After a crash, the latest completed checkpoint is available; the last unfinished operation may not be.

The footer reports whether recovery is saved or needs attention. Recovery complements explicitly saved projects.
An explicit startup image or project takes precedence over session restoration. Unsaved filament and TD1/S forms use Recover library edits and require review; recovery does not automatically save a filament or issue device commands. If recovery reports an error, save a portable project to a writable folder before closing.
Automatic copies before HueForge sends
Preferences -> Send to HueForge has Automatically save a Simpliforge project before sending, enabled by default. Each send saves a separate dated project copy. The usual folder is Documents / Simpliforge / Projects / HueForge; use Choose folder, Save folder, or Use default folder to change it.
The copy matches the image, settings, filaments, and edits captured for that send. Its path appears in the transfer result. It does not rename or overwrite your manually saved master. A failed save stops the send so you can fix the folder or deliberately disable copies. A copy already saved remains available even if HueForge cancels or the transfer fails. Validation and filament sync do not create project copies.
Presets, profiles, and preferences
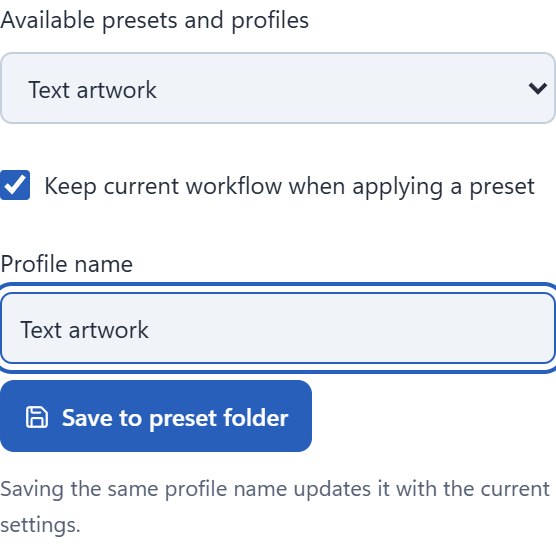
Presets reuse settings. Projects preserve the artwork and editable result.
Open Presets & profiles and use Available presets and profiles to choose built-in presets, your existing presets, or files in the preset folder. Name the current settings and choose Save to preset folder. The default is Documents/Simpliforge/Presets. Change folder, Use default folder, and Refresh profiles let you manage another collection. Saving the same profile name updates that file. Existing options-only presets are made available in this folder while retaining their original preset behavior.
Saved profiles use .simpliforge-profile.json and retain reusable processing options, filament filters, and the selected palette. Choosing a saved profile applies its saved workflow. Keep current workflow controls options-only preset application. Save profile as... and Load profile from file... remain available for files outside the collection. Individual exclusions require the matching library identity; mismatched exclusions are cleared rather than applied to the wrong spool. Imprint images and finishing settings can be included, but image-specific Region Edit footprints are not a reusable profile. Presets and profiles do not replace the source image or current library.
Reset processing settings returns tuning to defaults within the active workflow. Settings Undo/Redo is separate from the Region Edit history. Check the active context before using a shortcut.
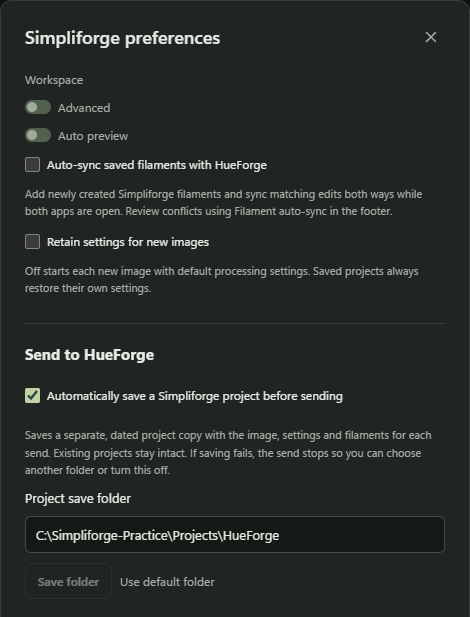
Preferences contains retained settings, default-on filament sync, the send-copy folder, and application version.
Defaults for new projects
Set reusable controls to the values you want, then open Preferences -> Manage defaults. Search for a field, check it, and choose Save defaults. Only selected fields become defaults for new images and projects. Unchecked fields use the application's built-in defaults.
For example, set Print -> Hard maximum depth to 3.2 mm, open Manage defaults, check Hard limit layer depth (mm), and save. The next image starts with a 3.2 mm limit.
The picker covers reusable image, print, export, Color Pop, border, Imprint, and experimental tuning. Artwork, sampled colors, filament identities, and geometry established when importing artwork stay specific to each project.
To update a saved value, adjust its normal control and choose Use current beside that field in the picker. Uncheck a field to restore its built-in default, or use Clear saved defaults and save to remove all overrides. Cancel leaves saved defaults unchanged.
Retain settings for new images is off initially. When enabled, it takes priority over your saved defaults and carries current settings to subsequent images. Turn it off to start each new image with your saved defaults. Existing projects, presets, profiles, and recovery restore their own settings. Remembered workflow tuning is preserved; defaults apply when entering a workflow for the first time.
Experimental features and Guided refinement
Preferences -> Show experimental features is off by default. Turn it on to show Litho, Hidden Litho, Jigsaw, Avoid artifact colors, and Flatten color patches. Turning it off hides their controls and entry points while preserving existing project values and results. Experimental defaults remain saved when hidden.
Surface spike cleanup is an Advanced tool and does not depend on this preference. Find it under Print -> Advanced -> Surface cleanup.
Guided refinement is no longer experimental and stays available when experimental features are hidden. Its comparison recipes include experimental artifact weighting and patch flattening only when this preference is on. If you change the preference while a Guided comparison is open, restart that comparison before applying a winner. See Guided refinement for the supported workflows and comparison procedure.
Guided refinement supports images up to 100 million pixels, including large text artwork. Every candidate retains the full-resolution result. Edge cleanup and patch flattening recipes are skipped above their separate 16-million-pixel limit; disable those settings in the starting preview when working with larger images. A progress bar reports generation, and Cancel discards the temporary session. Clicking outside the dialog or pressing Escape leaves it open. Retained compressed results have a 128 MiB session budget; reduce the alternatives or image size if that budget is reached.
For Simple reducer, Filament guided, and front-lit Color Match images up to 16 million pixels without Imprint, use Mark preferred areas during a comparison to draw up to eight boxes on the candidates whose local colors you prefer. Choose Generate from preferred areas to create new complete alternatives. Color Match still uses one shared physical filament stack; the boxes guide regeneration rather than pasting finished pixels together. Turn marking off to pan, and use Undo area or Clear areas to revise the boxes. Outside marked areas, the favorite supplies the target; a later box wins where boxes overlap. These are preferences for this comparison, not AI training. Apply a winner and save its project to retain the result. Temporary boxes are not saved, and later setting changes replan from the original source image.
Processing device
Preferences -> Image processing -> Processing device offers Automatic (recommended), CPU, and GPU. Processing GPU lets you choose a named graphics card or let Simpliforge choose one. The saved choice applies to the next run without restarting and stays separate from project settings.
On Windows, GPU processing accelerates supported color mapping stages. Image analysis, smoothing and filament/stack searches still use the CPU. Automatic considers the matching method, workload size and GPU startup cost; it currently retains CPU mapping for Oklab, Default CM, HSL and Dot product and can use the GPU for large CIELAB/CIELAB2 tasks. Explicit GPU mode attempts all six matching methods. Smaller images and some methods can be faster on the CPU.
Unavailable cards, unsupported tasks and device errors fall back to the CPU. Most recent color mapping stage shows the device actually used and any fallback reason. Refresh devices updates this information. A missing saved GPU remains selected until it returns or you choose another card. Cached previews may be reused without running another mapping stage.
Graphics -> Graphics adapter preference controls interface rendering separately. On Windows, its default follows the graphics preference for the running Simpliforge executable; changing the rendering preference requires restarting. This does not change the selected processing GPU. See Graphics and processing preferences for compatibility and limits.
Interface language
Preferences -> Language offers English and translation previews for French, German, Spanish, Italian, Polish, Korean, Dutch, Ukrainian, Cantonese (Traditional Chinese), and Japanese. Changes apply immediately and are saved for the application without changing project values. English remains the default. Some detailed help, technical diagnostics, native dialogs, and the user guide remain in English. See Interface localization for coverage.
Application updates remain manually installed in this version.
Themes
Preferences -> Themes changes the application's interface colors. Windows System (Light/Dark) follows the system's light or dark appearance. Choose Daylight Delight, Midnight Mode, Matcha Mission, Ocean Current, Grape Escape, or Sunset Circuit for a fixed palette. The selection applies immediately and is remembered across restarts. Themes leave image pixels, filament colors, and processing settings intact.
Detailed debugging and support logs
Preferences -> Debugging & support -> Detailed debugging is off by default. Turn it on before reproducing a problem, then choose Save support log to create a separate .log file for your support report. On Windows, Open log folder opens the folder shown in Preferences. Turn debugging off when finished; previous logs remain available to export.
The log records application and system versions, operation timings, processing stages, warnings, and errors. It does not embed artwork, project contents, or the filament library. File paths and likely secrets in diagnostic messages are redacted. Logs stay on your computer and are not uploaded automatically. Each active log is limited to 5 MiB, with up to three older files retained.
If Preferences shows a logging warning, check that the displayed folder is writable and has free space. A logging failure does not stop normal processing. Attach the saved support log with the steps that reproduce the problem.
Check print readiness
Open Print readiness in the top bar, File -> Print readiness, or the Send & export step. The panel checks the current completed preview and brings the results into six areas. It does not change settings, generate a new preview, write files, connect to a device, or send to HueForge merely by opening.
| Area | What is checked or shown |
|---|---|
| Preview | The image, captured processing settings and filament filter agree with the current workspace. Import notes remain available in Details. |
| Print dimensions | The resolved physical footprint, including a frame where enabled, and the captured image depth. Confirm nominal dimensions and printer bed fit in the slicer. |
| Layer schedule | Full-resolution heights and filament runs agree. Details show first and regular layer heights, runs and changes, followed by the slicer reminders. |
| Border and cut geometry | The current frame and puzzle geometry resolve. Preparation errors explain what needs correction. |
| Filaments and transmission distance | Captured filament choices, library ownership flags and TD values, with spool and lighting advisories. |
| Export data | The captured image and plan pass the preparation checks for each available output. Native HFP export and public-SDK sending are assessed separately. |
Passed describes the software check shown. Review needed identifies an advisory, such as confirming spools or slicer settings; it can coexist with an available output. Fix needed identifies a failed check, and Not applicable explains a physical check that an image workflow does not have. Use Details for the explanation. Review settings, View stack, Review geometry, and Review TD take you to the existing workspace controls. A setting change requires a fresh assessment of the resulting preview.
Choose an available output
Stack workflows offer Export HFP when the file plan prepares successfully. Send to HueForge has its own preparation and receiver requirements. An HFP can be valid when a public-SDK send limit prevents direct transfer; a disabled Send button does not automatically invalidate file export. Some outputs need attention means the results differ. Read the output-specific details before choosing how to continue. If HFP preparation fails but the completed image is valid, Export PNG instead remains available. That PNG carries the image, not the physical layer plan or puzzle cuts.
Simple reducer and Filament Guide prepare images rather than physical stacks. Their primary output is Export PNG, and physical dimensions, layer schedule and geometry are marked not applicable. Continue the final print planning in HueForge. Image-only Color Pop has the same distinction.
The readiness buttons use the normal export and HueForge workflows. Export still checks the chosen filename, destination permissions and overwrite choices when you save; readiness does not prove that a particular folder is writable. Connect or Connection settings opens the existing connection tools. Clicking Send to HueForge explicitly uses the same direct sender as the top bar, including destination selection and HueForge's unsaved-project handling where needed. Opening readiness or connection tools never resends a transfer.
Refresh without losing edits
If settings differ from the completed preview, use Refresh preview before
exporting or sending. For a stale Region Edit result, the action becomes
Restore edited preview settings. It restores the settings behind that
result while preserving its edited heights and groups; it does not replace them
with a newly generated unedited stack. Save the .simpliforge project to retain
the editable document.
TD values and ownership flags come from the captured library. Readiness does not establish whether a TD was measured or estimated, measure remaining spool quantity, or confirm actual print colors. Match the first and regular layer heights in the slicer and inspect the imported mesh, changes and bed fit. A software preparation check does not replace spool measurements and a test print.
Export files
Open Export or Send & export, choose a format, and make sure the preview is current. Exports do not silently substitute a stale result for changed settings. With region groups, Restore edited preview settings offers the non-destructive way back to the edited result.
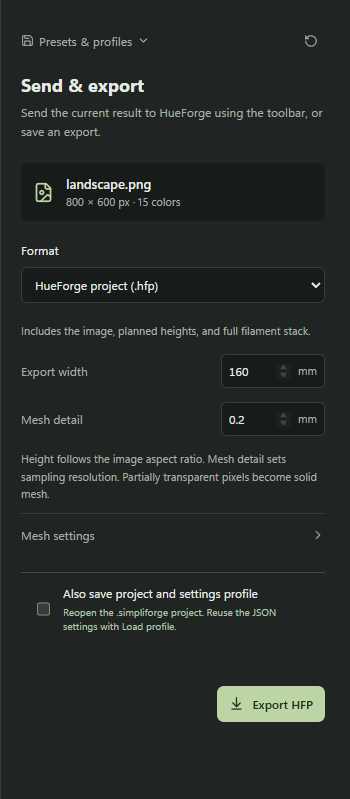
Choose the format for the next task. Keep a Simpliforge project to retain editable history and settings.
| Format | Contains | Use it for |
|---|---|---|
| Full-resolution PNG | Processed image with alpha | Image preparation and sharing a rendered result. |
| Palette report (.json) | Color, filament, plan, and diagnostic data as applicable | Analysis and inspection of the generated result. |
| Simpliforge project | Source, settings, library, result, and editable features | Continuing the complete project later. |
| 16-bit layer map | Literal one-based layer numbers; zero is transparent | Technical workflows that understand this encoding. |
| HueForge project (.hfp) | Image, stack, planned heights, dimensions, supported finishing | Continuing the planned print in HueForge. |
The layer map is not an ordinary normalized grayscale height image, STL, or G-code. PNG and layer-map exports contain the image rather than the added border or Jigsaw geometry. Imprint and applied region edits affect the image result and layer heights.
HFP settings and edited heights
Set Export width and Mesh detail. Smaller detail spacing means finer mesh sampling and more work. Height follows the aspect ratio. Partially transparent pixels become solid mesh; fully transparent pixels remain holes where the export supports them.
Keep Tuned image colors (recommended) for ordinary Color Match unless you are deliberately comparing another supported Mesh Core strategy. Physical filament TDs and virtual image-color TDs have different roles. Exact-height exports such as region-edited plans can use the flat-TD exception described under layer inspection.
HFP reserves an unused layer of import headroom. It can make HueForge's displayed maximum exceed the chosen print depth; it is excluded from matching and does not itself add a physical image layer. First and regular layer heights must be representable in HueForge's 0.01 mm increments.
HFP transfers whole-region edits as native HueForge SpotFix groups when that can reproduce them exactly. Other edits are baked into the final height mapping. Rounded/selected-side borders, Jigsaw, and some combined geometry also require baked heights. The complete named groups and editing history belong in the Simpliforge project. Changing HueForge's mesh mode or image matching can recompute the plan, so inspect the imported colors and heights before proceeding to the slicer.
Save companions
Enable Also save project and settings profile to write a portable project and profile beside an ordinary export. For example, Landscape.hfp gains a companion project and settings profile named from that export. Existing companion files receive their own overwrite review. If an I/O problem occurs after one file succeeds, the message identifies what was already written.
Send to HueForge
The local bridge transfers between applications on the same computer. Install the current Windows bridge and use a supported matching HueForge host. An old plugin can remain loaded until HueForge restarts.
Send from the top bar
- Generate a current preview and save any work you need to keep in HueForge.
- Choose Send to HueForge.
- If one suitable instance is detected, Simpliforge sends immediately without a destination dialog. With multiple instances, choose the intended project.
- If none is detected, Simpliforge can launch the installed HueForge and wait for its receiver. A missing or disabled plugin still needs to be installed/enabled.
- Review the transfer result. Save the imported project in HueForge when ready.
A stack preview sends the full plan; a non-stack preview sends the image. Opening connection tools or starting a background status check is not permission to resend a previous transfer. Background checks do not launch HueForge.
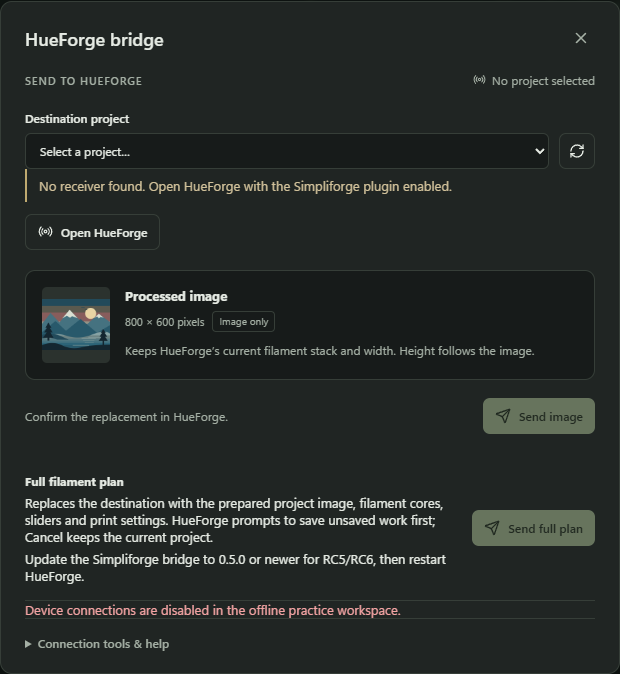
The connection panel separates processed-image transfer, full-plan transfer, and diagnostic tools. An offline example does not demonstrate a live HueForge connection.
Full plan versus image only
A full plan carries the prepared image, filament stack, sliders, physical settings, and supported geometry. HueForge's native Save / Discard / Cancel handling protects an existing unsaved project before replacement. Cancel keeps that project. Once the host begins applying an accepted full plan, the client cannot safely interrupt it.
Direct full-plan sending includes final region-edited heights through the image and Color Match data. It does not create native SpotFix groups through this SDK. Those editable groups remain in the saved Simpliforge project. HFP export has the separate native SpotFix behavior described above.
Large full-plan images are automatically resized in the transfer copy to fit HueForge's limits of 8192 pixels per side and 16,777,216 total pixels. A 5016 by 5016 image sends at 4096 by 4096. The transfer result shows the original and sent sizes. The source, preview, saved Simpliforge project, HFP export, and physical print dimensions stay unchanged. Fine details can be lost at the reduced resolution. Oversized Jigsaw plans require HFP export to preserve their cuts.
For an explicit image-only replacement, open HueForge tools and choose Send image. Confirm the Import image dialog in HueForge. Cancel and save there first if needed. Image import preserves the existing physical width and requests preservation of the stack, sliders, and SpotFix settings; height follows the incoming image's proportions. It does not transfer the new Simpliforge filament plan. A border is included in the sent picture, while Jigsaw requires full-plan transfer or HFP.
Read the status correctly
Connected means a receiver is responding. A verified receipt confirms that the transferred bytes and decoded pixels match the prepared image. Image submitted means the SDK accepted a queued operation; it does not prove HueForge finished rebuilding. A full-plan load has a separate outcome.
Connection tools & help includes refresh, Validate preview without changing the project, transfer status, and explicit live-library sending. Closing this panel leaves an active transfer running. Reopen it to inspect the receipt. A receipt may belong to an earlier preview, which is labeled. Uncertain or disconnected transfers are not automatically resent.
If the public bridge limits reject a complex plan, use HFP export. The direct interface has limits including its core count; file export and the receiver do not have identical capabilities.
Sync filaments with HueForge
Auto-sync saved filaments with HueForge is on by default. Newly created, saved Simpliforge filaments can be added to HueForge. Edits to matching filament identities synchronize both ways while both applications are open. Changes use HueForge's live library API; they are not merely edits to its JSON behind the running application's back.
Use the footer's Filament auto-sync to inspect status. A single running HueForge instance is required for automatic sync. Close extra instances to remove ambiguity. Sync waits while library forms or workspace operations need protection, and existing region groups can prevent incoming library changes from replacing the plan.
For a conflict, compare the displayed fields and choose Use Simpliforge or Use HueForge. The selected version becomes the agreed value in both applications. An uncertain addition requires checking HueForge before explicitly retrying. Disabling auto-sync in Preferences pauses automatic transfers; it does not undo earlier synchronized changes.
Current limits matter:
- Matching uses a stable filament UUID, not just the displayed name or color.
- Existing unmatched entries need a manual first send through HueForge tools.
- A new filament with unknown or invalid TD waits until it has valid data.
- Filaments created only in HueForge are not automatically discovered through this SDK view.
- Deletions are not synchronized, and a previously synchronized missing row is not silently recreated.
- Some unowned entries are absent from HueForge's exposed library view.
Incoming changes preserve supported private metadata and measurement history, back up the managed library, and require a fresh preview. HueForge's normal library save may also save pending library changes already made there.
Practice projects
These exercises use only the original documentation artwork. Results depend on your actual filament measurements; there is no universal spool recipe.
1. Plan a landscape and keep an alternate version
Open landscape.png, choose Color Match, and start with eight filaments and Balanced smoothing. Set the actual print size and heights, then generate. Save the current comparison. Try Distinctive colors and compare the small accents with the first result. Choose the better-looking candidate and save Landscape.simpliforge before exporting its HFP.
2. Keep the garden accent in color
Open color-pop-garden.png and choose Color Pop. Select Choose colors to keep, sample an accent, and examine Selection. Narrow the hue range if neighboring colors are unintentionally selected. Export a prepared PNG first; then choose Plan filament stack to compare color-above-gray and gray-above-color bands.
3. Move one visible layer
Reopen the saved landscape. Inspect layers, choose a layer with visible coverage, and select Select visible areas. Assign that selection one layer higher within the existing stack. Compare Before edits, undo, and redo. Save as a separate project if you want to preserve the untouched version. Temporary layer hiding alone should never alter the exported plan.
4. Add a border and a signature
On a copy made before region editing, add a 4 mm external border. Choose an existing spool for a taller border-only run and inspect Frame. Add relief-badge.png as a small Top imprint. Review its printed layer and scale, then export HFP. Keep the .simpliforge file to reposition the signature later.
Keyboard and pointer reference
Use Tab and Shift+Tab to move between ordinary controls. Buttons, numeric inputs, and labeled alternatives complement dragging. The layer inspector offers a menu button for actions also available by right-click. Color placement provides arrows as an alternative to dragging groups.
| Action | Shortcut or gesture | Context |
|---|---|---|
| Open image | Ctrl+O | Main workspace. |
| Open project | Ctrl+Shift+O | Main workspace. |
| Save project | Ctrl+S | Main workspace. |
| Save project as | Ctrl+Shift+S | Choose a new filename and make it the current project. |
| Export PNG | Ctrl+E | Requires an exportable preview. |
| Undo / redo | Ctrl+Z / Ctrl+Shift+Z | Settings, or Region Edit history when editing. |
| Zoom | Wheel or zoom buttons | Image and Region Edit views. |
| Pan while selecting | Space-drag or middle-button drag | Region Edit. |
| Finish polygon | Enter | Region Edit polygon selection. |
| Cancel selection gesture | Escape | Unfinished Region Edit gesture. |
| Add / subtract selection | Shift / Alt | Applicable Region Edit gestures. |
| Protect a palette color | Shift-click a swatch | Result palette. |
| Open user guide | F1 | Main workspace. |
On macOS, supported command shortcuts use Cmd in place of Ctrl. Escape closes applicable dialogs or cancels an active picker. Shortcuts do not replace the confirmation required for destructive group resets or cuts. The application has keyboard-accessible controls, but complex image selection still benefits from a pointer; complete screen-reader parity is not claimed.
Troubleshooting
The preview is stale or export is disabled
Wait for the active operation or choose Refresh preview. If region edits exist, use Restore edited preview settings to preserve them. Do not reset edits merely to dismiss an error unless you intend to discard them. If a library change is pending, finish or cancel its editor operation first.
A preview finished without a result
Preview failed means generation ended with an error; Preview needs updating means the current settings need a new result. A failed generation does not add a Preview version. Read the persistent failure notice above the image, correct the reported setting, then choose Retry preview. Switching Image, Filaments, or Print tabs does not dismiss it. The notice remains until you dismiss it, complete a successful preview, or open another document. Dismissing its details leaves the Preview failed status visible. For a diagnostic file, enable Detailed debugging, reproduce the problem, and use Save support log under Preferences.
No eligible filaments
Confirm the selected library, then review ownership, material, secondary-color, and finish filters. Check that TD values are positive and colors valid. A generic no-eligible message does not identify one specific filter. Restore a deliberately excluded spool or relax a constraint where appropriate.
HueForge will not connect
Confirm that the current plugin is installed and enabled and that the host version matches it. Refresh receiver status and allow a busy HueForge to respond. After a plugin update, save work and restart HueForge to load it. Restarting Simpliforge alone cannot replace a plugin already loaded inside HueForge. A detected application process without a working plugin is not a usable receiver.
The transfer failed or has an uncertain result
Read the receipt, check the project currently open in HueForge, and retry only when you know the intended result was not applied. Verify the send-copy folder if saving failed first. A submitted image can still be rebuilding. Keep the saved project copy regardless of the transfer outcome.
The native mesh differs from the flat preview
Check dimensions, aspect ratio, mesh mode/detail, lighting, layer heights, and real filament data. Use HFP or a full-plan send when you need the planned geometry; image-only transfer keeps the receiver's stack. Crossed Mesh Core heights and physically removed layers are different. Inspect rounded borders, tiny imprints, transparent cutouts, and puzzle seams at the final mesh resolution.
Processing is slow or memory is tight
Version 1.4.8 reduces repeated work in color planning and cached previews while retaining the existing search and quality settings. These changes do not guarantee a general RAM reduction or move additional search work to the GPU. Processing cost still depends on the artwork and planning settings.
Use Normal preview, reduce analysis resolution, lower unnecessary candidate/run/depth limits, and batch edits with Auto preview off. Work from an appropriately sized copy when using Region Edit on an oversized source. Export still needs enough memory for its final geometry. Save a project before major experiments.
When reporting a problem, include the Simpliforge version, workflow, exact message, operating system, relevant HueForge/bridge version, and steps to reproduce. Use the provided example artwork if possible. A .simpliforge project embeds the source image and filament library: share only a copy you are authorized to disclose.
For a detailed diagnostic file, turn on Preferences -> Debugging & support -> Detailed debugging, reproduce the issue, and choose Save support log. See Detailed debugging and support logs for what it records and how to switch it off afterward.
Command-line use
The release includes simpliforge-cli (simpliforge-cli.exe on Windows). Run --help for the exact supported options in your build. The CLI processes files; it is not the interactive library editor or layer-inspection window.
From a Windows release folder, a basic total-budget reduction is:
.\simpliforge-cli.exe landscape.png -o landscape-reduced.png `
  --total-colors --colors 8
To prepare a Color Match plan and layer map with your exported library:
.\simpliforge-cli.exe landscape.png -o landscape-stack.png `
  --hueforge-library my-library.json --colors 4 --hueforge-stack `
  --palette-json landscape-plan.json `
  --hueforge-height-map landscape-layers.png
Use --settings-profile FILE to reuse a saved settings profile. Use --simpliforge-project FILE for a portable project output; the older ColorNinja option name remains an alias. Profiles override processing flags, so check which source of settings you intend to use. Existing output files require explicit overwrite with --force. Keep source, library, and output paths distinct.
Add --strengthen-outlines --outline-strength 60 for stronger detected dark
strokes. --outline-black-layers 2 requests a minimum black thickness in
frontlit Color Match; 0 leaves thickness to automatic planning. See
Strengthen dark outlines for supported workflows.
For frontlit Color Match height cleanup, add
--reduce-surface-spikes --surface-spike-strength 50 --surface-spike-max-area 16.
Strength 0 reports candidates without editing. See
Reduce surface spikes.
For HFP output, add --hueforge-project landscape.hfp to a compatible stack command. --export-profile saves reusable profiles beside outputs. The CLI's historical defaults differ from new desktop settings; using a saved profile is the most direct way to repeat desktop processing choices. A profile with individual filament exclusions needs the matching library.
Terms used in this guide
| Term | Meaning |
|---|---|
| TD | Transmission distance in millimeters, used with filament color to model blending. |
| Layer | One physical printed height step. Layer 1 uses the first-layer thickness. |
| Run | A continuous sequence using one spool; a returning spool starts another run. |
| Color Core | The physical filament schedule that determines predicted printed colors. |
| Mesh Core | Virtual image-color entries used to match image pixels to heights. |
| Matching target | A height the image is allowed to select; excluding it does not necessarily remove printed material. |
| Region | A connected area at a particular height, or an explicitly selected pixel footprint. |
| Current preview | A completed result that corresponds to the active settings and library context. |
| Portable project | A saved editable document with embedded source, settings, library, and result data. |
| SDK | The interface exposed by HueForge to plugins; it does not offer every HFP-file feature. |
For concise answers, see the Simpliforge FAQ. For installation compatibility, use the notes attached to the specific release you install.
Simpliforge FAQ
Version 1.4.8
Quick answers for the current production release. For complete procedures and screenshots, read the User Guide or download the PDF user guide. Use Help & user guide or F1 in the application for offline help and Save PDF guide for a separate PDF copy.
Installation and getting started
1. What does Simpliforge do?
It simplifies images, predicts filament stacks and their colors, assigns image regions to printed heights, and prepares results for HueForge. It also manages filament libraries and supports TD1/TD1S measurements. It does not replace the slicer or generate printer G-code. See Your first project.
2. Is Simpliforge the same application as ColorNinja?
Simpliforge continues ColorNinja under the new name. Version 1.3.0 is the first production release of Simpliforge. Older ColorNinja projects, profiles, and compatible settings remain readable. Historical documents can describe a different layout; use the current guide for the four-step workspace.
3. Does the combined installer install the application and the plugin?
Yes, on Windows. Simpliforge-1.4.8-windows-x64-with-hueforge-setup.exe installs Simpliforge and the optional HueForge bridge (install or repair) component. Leave that component selected for both. Automatic bridge installation accepts HueForge 0.9.4.4 or later, using executable version metadata. For the previous macOS 1.4.6 packages, install the application ZIP and use HueForge's Manage Plugins -> Install for the matching bridge ZIP. Bridge 0.8.0 preserves the previous plugin identity. Close both programs before upgrading and follow HueForge's plugin approval. See Install and update.
4. Which operating systems are supported by the release packages?
The 1.4.8 release updates Windows x64 only. The previous 1.4.6 release retains Linux x64, macOS Intel, and macOS Apple Silicon packages with matching HueForge bridges; those packages do not include 1.4.8 changes. Linux packages target Ubuntu 24.04. Mac packages require macOS 13 or later. Install the Linux and Mac bridges through HueForge's plugin manager. Builds are unsigned; Mac packages are not notarized. See Production package scope.
5. Will the application update automatically?
No. Application update checks remain disabled for this production version. Install the desired available release manually. Device firmware tools under TD1/TD1S are separate explicit operations and remain available. Never confuse an application update with a device firmware update.
6. Do I need an account or an internet connection to process an image?
No. Image processing, saved projects, and bundled help work locally. Opening profile websites and using vendor firmware downloads require internet access. The HueForge bridge communicates between programs on the same computer.
7. Which example images can I use with the guide?
The original landscape, Color Pop garden, and relief badge were created for the documentation. No user's working artwork or third-party characters are used. The practice filament library contains invented data for learning, not measured spool recommendations. See Practice projects.
8. Where is help, and can I get it as a PDF?
Choose the Help icon, File -> Help & user guide, or F1. The guide and FAQ are bundled for offline reading. Save PDF guide saves a separate document, and release assets provide the distributable guide. PDF is a documentation format here, not a print-plan export format.
Help also offers First project walkthrough and Advanced topics for interactive lessons on the real application controls. See Interactive walkthroughs.
Workflows and image tuning
9. Which workflow should I start with?
Start with Color Match when you have a filament library and want a complete stack. Use Simple reducer for an image-only palette reduction, Filament Guide for a filament-informed PNG, and Color Pop for selected hues against grayscale. Color Match is the default for fresh settings. See Choose a workflow.
10. Why do I see more colors than the Maximum filaments number?
The limit counts unique spools. Layers blend, so several colors can be produced by the same filaments at different heights. Maximum filament runs is another limit: returning to the same spool later adds a run, not another unique filament. Simple reducer's budget counts output colors instead.
11. Why did Simpliforge use fewer colors or filaments than I requested?
The number is a maximum, not a required target. A simpler image or constrained library may need fewer. Required spools count against the same budget, and an impossible set of required/base/final constraints can block planning rather than force an invalid result.
12. How are smoothing and Preserve details different?
Smoothing reduces texture before mapping. Preserve details gives small coherent features additional protection within the available budget. They are independent: selecting Off, Gentle, Balanced, or Strong does not switch detail preservation off. Strong smoothing can still soften low-contrast features, so inspect at the intended scale.
For larger mottled patches, Simple reducer also offers Image refinement -> Flatten color patches (experimental). Increase patch area before color tolerance and compare carefully: it can remove intentional shading. This operates after palette selection, so the local detail check does not approve the final flattening. See Image refinement.
12a. Can I make off-black cartoon outlines stronger?
Enable Strengthen dark outlines below Preserve details, then adjust Outline strength. Choose Feature -> Detected outlines after generating a preview to inspect the selected strokes. This favors darker existing lines without widening them. 0% shows detection without darkening. In frontlit Color Match, Black layers sets a minimum black thickness under the detected lines (default 2; 0 leaves thickness to automatic planning), within the print's existing limits. A positive count requires an eligible Black filament.
This differs from Vivid colors, which prioritizes colorful accents, and Use true black, which changes the modeled RGB of eligible black filaments. Outline strengthening keeps measured filament TD unchanged. It starts off and supports Simple reducer, Filament Guide and frontlit Color Match; detection can mistake shadows for linework. See Strengthen dark outlines.
13. What is the difference between the three Color priority choices?
Overall balance favors area-weighted matching. Distinctive colors gives smaller accents and different hue families more influence. Vivid colors emphasizes colorful accents and hue accuracy without increasing saturation. They work within the existing budget; no option guarantees that the software recognizes the most important object. See Shape the image.
14. How do I select protected colors, and what do they protect?
Expand Protected colors and sample the original, enter a hex value, use the color picker, or choose a palette swatch. Selected colors appear as swatches with hex codes. Shift-click a result palette swatch for a shortcut. They reserve palette slots in Simple reducer and prioritize source colors in filament workflows. They do not guarantee an exact printed color or force a particular spool.
15. Does color placement move just one object?
No. It expresses a preferred bottom-to-top order for broad source-color families, potentially affecting several objects sharing those colors. Order strength controls the influence. Use Region Edit to move a particular area. Custom color placement and automatic layer-order preference are alternative planning influences.
16. Why are Color Pop controls missing, or why is everything gray?
Color Pop controls appear only when that workflow is selected. In Choose colors to keep, the result remains grayscale until you add a sample. Sample the desired hue, adjust Similar hues and Grayscale tolerance, and inspect Selection. A hue selection applies throughout the image, not just to the clicked object.
17. Does reducing analysis resolution make my exported PNG smaller?
No. It limits color analysis work. Mapping and ordinary PNG export still use the original image pixels and dimensions. This is useful for faster experiments. Region Edit and geometry exports have their own size limits, so a feature may still require a smaller source even if analysis resolution is low.
18. Can I use transparent, animated, or high-bit-depth images?
Transparency is supported. Animated GIF/WebP uses its first frame. Processing is 8-bit RGBA, so HDR/16-bit precision is not retained. Supported profiles are converted to sRGB and orientation is applied. For HFP, partially transparent pixels become solid mesh; completely transparent pixels form holes where supported. See Source image support.
Comparing, layers, and Region Edit
19. What is the difference between preview layout and feature?
Layout chooses Single, Slider compare, Side by side, or Preview history. Preview history shows Original -> Last Preview -> Current Preview together. The other layouts retain Feature choices such as Result, Original, layer map, Frame, Puzzle, or Color Pop Selection. Side by side is the new-session default. A recovered session retains its layout. See Compare and inspect results.
20. What do Swap panes, Compare saved results, and Preview history do?
Swap reverses the original and preview panes without changing processing. Compare saved results opens stored comparison cards and stack alternatives. Applying a card uses its settings with the current image and library. A comparison thumbnail is not a complete saved project.
Preview history keeps the last successful preview in this session; changing the source or reopening a project clears Last Preview. Restore last settings restores its processing options and filament filters and rerenders even with Auto preview off. Export and sending wait for the fresh result. The source and filament inventory must still match. If either result contains Region Edit groups, settings cannot restore their pixels and the button is disabled; use Region Edit Undo/Redo instead. Failed or unfinished previews never become Last Preview.
20a. How can I restore an older preview, including its Region Edit groups?
Open Preview versions in the image toolbar or File -> Preview versions. Every accepted, completed preview for the current image session appears in a gallery, newest first, with a thumbnail, time, color count, workflow, and print depth when available. Failed, canceled, and unfinished previews are excluded.
Choose Restore to recover that exact result, settings, filament filters, and editable Region Edit groups. This uses the saved result directly with a fresh validated preview identity, so Auto preview can remain off. It preserves preferences and the viewer layout and does not add another copy to the gallery. Restoring the current version also discards unapplied settings changes.
The source and filament inventory must still match. These versions use temporary snapshots and small thumbnails on disk; opening another image or project or closing the application normally clears them. They are not saved project backups. Save a Simpliforge project to retain a result after closing the session.
20b. Can I compare two older previews side by side?
Yes. In Preview versions, check Compare version on two cards, then choose Compare selected (2/2). Their full-resolution result images share pan and zoom. Scroll over either image, drag to pan, and double-click or choose Fit / reset to fit both again. Review the settings differences below the images. Comparing neither runs processing nor changes the current result. The versions remain temporary; save a project to retain a winner after closing.
20c. Why did generation stop without adding a preview version?
Failed, canceled, and unfinished generations are excluded from the gallery. Preview failed reports a processing error; Preview needs updating means the settings need a fresh result. The failure notice stays visible across tabs and includes Retry preview. Correct its reported cause before retrying. Dismissing the notice hides the details, while the failure status remains until a successful preview or a new document. For troubleshooting, enable Preferences -> Debugging & support -> Detailed debugging, reproduce the problem, and choose Save support log.
21. Does hiding a layer change the print or exported file?
No. Inspector visibility is temporary. It reveals lower planned surfaces without recalculating optical blends and does not delete material or alter exports. Show all restores the view. Project filament exclusion and actual Region Edit operations are separate actions. See Inspect layers.
22. Why are some Mesh Core heights striped or crossed in HueForge?
Those heights are excluded from image matching, not necessarily removed from the physical print. A lower layer may still print underneath higher surfaces, and border-only heights need not be image targets. Real filament layers, virtual Mesh Core matching entries, and Simpliforge's temporary visibility controls have different roles.
23. Are tuned TDs used, or is the exporter disabling matching heights again?
Ordinary Color Match normally uses Tuned image colors with adjusted virtual Mesh Core TDs. Current region-edited and other exact-height paths can still use legacy flat 0.01 TD mappings and disable unused matching heights. This version has not removed that exception. The physical spool TD measurements remain unchanged; do not change them to match the virtual entries.
24. How do I move everything visible on one layer?
In Inspect layers, select the layer, set its visibility, and choose Select visible areas. Region Edit opens with the corresponding editable pixels selected. Use Assign layer to put them all at one height or Move layers for a relative shift. Then review, undo if needed, and save the project. See the step-by-step instructions.
25. What exactly does Select visible areas select?
With all layers shown, it selects the chosen layer's visible image surface, including disconnected islands. Hiding higher layers includes areas exposed underneath; isolation can select that layer's physical footprint. Original transparency, cutouts, and protected groups are excluded. The target layer must be visible. It uses full-resolution heights, not interpolated mesh-shading pixels.
26. Why does a lasso select nothing or more than I expected?
Check Selection coverage. Enclosed regions requires whole connected regions inside the shape; Touching regions includes whole regions touched by it; Pixels inside follows the drawn footprint. Review Add/Subtract/Intersect and the selected pixel count. Diagonally touching areas alone are not one connected region. See Edit regions.
27. How do Assign layer, Move layers, and Cut hole differ?
Assign puts selected pixels at one height. Move shifts them relative to their existing heights within the current stack limits. Cut hole removes selected coverage through the base and asks for confirmation. Ordinary lowering preserves the base. Restore generated heights can undo selected manual changes, including editor-created cuts.
28. Why are some selected pixels unchanged after an edit?
An enabled protected group blocks later operations on its footprint. Unlock it if a later edit should affect those pixels. A move also clamps at printable limits, and original transparent pixels are not ordinary editable material. Inspect the group order and Before edits state as well.
29. The warning says I must reset region edits. Can I keep my work?
Yes. If a changed setting made the preview stale, choose Restore edited preview settings to recover the settings and saved library behind the edited result. This retains its heights and groups and re-enables compatible export. If you truly want a different stack, save a project copy before explicitly resetting edits. See When changed settings block export.
30. Will my Region Edit groups stay editable in HueForge?
Direct full-plan sending carries final edited heights but does not create native SpotFix groups through this SDK. HFP can create SpotFix groups for compatible whole-region edits; other edits and geometry combinations are baked. Save the .simpliforge project for the complete named groups, protection, and future editing.
Print size and finishing
31. Should dark colors always be at the bottom?
No. A dark base is often useful, but the best order depends on transmission, substrate, later colors, and the intended relief. Automatic order is a preference-based search, not a universal darkness sort. Use a base constraint or custom Color placement deliberately and compare the actual result.
32. What does automatic depth optimize?
It compares eligible plans below the hard maximum and can prefer a thinner candidate within the configured score allowance. The ceiling includes the base. It does not guarantee the globally best appearance or smallest material volume. Deeper refinement explores more arrangements; assess the resulting colors and boundaries. See Plan the print.
32a. Can I reduce tiny raised spikes without flattening the whole image?
For modern frontlit Color Match, enable Advanced in Print, then try Surface cleanup -> Reduce surface spikes. It starts off and can lower small isolated high regions using shades already available in the stack. Spike reduction strength starts at 50%; Maximum spike area starts at 16 original source pixels. Strength 0 inspects candidates without editing.
Review the candidate/reduced region counts, changed pixels and maximum lowering, then compare the image and layers. Fine-edge guards are conservative rather than semantic: small intentional details may resemble spikes, and some spikes can remain. Controlled fixtures do not establish improvement on every illustration or physical print. TD measurements stay unchanged. See Reduce surface spikes.
This is an Advanced control, available independently of Show experimental features. An enabled saved setting remains visible and editable even when Advanced is off.
33. Why do depth values snap when I finish typing?
The plan must end on a physical layer. Height is first-layer height plus whole regular layers. At 0.16 mm first layer and 0.08 mm regular layers, 0.86 mm snaps to 0.88 mm. Automatic maximum depth is a hard ceiling and rounds down rather than exceeding your limit.
34. Is border depth added on top of the image?
Border depth is total height from the build plate. If the image ends at layer 22, a 4.0 mm border at 0.16/0.08 mm uses layers 23-49 for the chosen border filament. An explicit filament must be one already used in the image and requires height above it. See Add borders.
35. Can I change the border in HueForge afterward?
A square all-sides HFP/full-plan border retains native border controls. Rounded or selected-side borders are baked into geometry; change them in Simpliforge and export again. An image-only transfer carries a picture of the frame, not editable native border geometry. Preserve your .simpliforge master.
36. Does Imprint create an underside engraving or a new filament color?
No. It changes the top surface to heights available in the existing stack. Base, Top, and Custom layer target a particular height; Follow surface recesses from each local height. The resulting color comes from the existing filaments. It does not create hidden cavities. See Add an imprint.
37. Why did Jigsaw export fail, or why are cuts missing from my PNG?
HFP or a full-plan send carries the physical cuts. PNG and layer-map exports do not, and image-only sending is disabled while Jigsaw is enabled. Export rejects split/missing pieces caused by narrow features, transparency, or unsuitable gaps. Try fewer pieces, a different gap, or a new pattern. Jigsaw is experimental; test physical fit. See Make a jigsaw.
Filaments, devices, and synchronization
38. Why does my library show no eligible filaments?
Check the selected library and its ownership, material, secondary-color, and finish filters. Stack planning needs valid colors and positive TD. Project exclusions also reduce eligibility. The editor can show records the planner cannot use. A generic message does not identify which one of these constraints caused the empty result.
To return to HueForge's native personal library, choose Filaments -> Use HueForge library. It finds and reloads that library even after you selected another file. If discovery fails, your current selection stays unchanged; use Change library to locate the file manually. See Choose filaments for a project.
39. Does editing a filament overwrite my original HueForge JSON?
The first edit of an external library creates a managed Simpliforge copy. Later edits back up that copy. Export library writes another JSON file. With auto-sync enabled and a matching live receiver, saved filament changes may also be sent through HueForge's SDK, where HueForge saves its own library normally. See Manage your filament library.
40. What exactly synchronizes automatically with HueForge?
Newly created and saved Simpliforge entries can be added; edits to matching UUIDs synchronize both directions. Existing unmatched entries need a manual first send. New HueForge-only entries are not automatically discovered by this SDK view, and deletions are not synchronized. One HueForge instance is required. See Sync filaments.
41. Why is synchronization waiting or asking me to choose a version?
It protects unsaved editor forms, active workspace operations, and region-edited plans. Finish the relevant work before applying incoming changes. A conflict means values differ and need review; compare the fields and choose Use Simpliforge or Use HueForge. An uncertain addition is not automatically retried. Check the remote library before explicitly retrying it.
42. Can I take a TD measurement without replacing the profile's color?
Yes. Apply the reading to the selected editor and leave Also replace filament color off. Review and Save filament. Device identity, timestamp, measured color, and prior TD history are retained. TD zero means unknown and excludes the entry from stack planning. See Measure with TD1 or TD1S.
43. Why will my TD1/TD1S not connect or finish an update?
Use a USB data cable, refresh devices, and close other programs holding the serial port. Linux may need serial permissions. After changing settings or firmware, reconnect and read the version; a successful transfer alone does not prove installation. Use the app's supported backup/restore and vendor recovery procedures for device-specific failures.
Saving, exporting, and HueForge
44. What is the difference between a project, preset, profile, and recovery?
A project is the portable editable document with source, library, settings, and result. A preset is locally named reusable settings. A profile is a settings file for another image. Recovery is the latest completed local checkpoint after closing or a crash. Comparison thumbnails and reports are not full project backups. See Save projects and recover work.
44a. How do Save and Save As choose a filename?
Save project (Ctrl+S) asks once for an unsaved image, then saves to the current project's filename. Opening a saved project also sets that target. Save project as… (Ctrl+Shift+S) opens a dialog using the current name and folder so you can create another version. Successful Save As makes the new file the current project. Automatic copies before HueForge sends keep their separate dated names and do not change your manual save target.
45. Can I control the project copies saved before sending?
Yes. In Preferences, change Project save folder or disable Automatically save a Simpliforge project before sending. It is on by default and normally uses Documents/Simpliforge/Projects/HueForge. Each send gets a separate dated copy. A save failure blocks sending, and a completed copy remains even if HueForge cancels the transfer.
46. Which export should I use for HueForge, and is the layer map an STL?
Use HFP or full-plan sending for planned filaments, heights, and supported geometry. Use PNG or image-only sending when you want HueForge to retain or create its own stack. The 16-bit layer map contains literal layer numbers, with zero for transparency; it is not STL, G-code, or a normalized grayscale height map. See Export files.
46a. Where can I check print readiness?
Choose Print readiness in the top bar, File -> Print readiness, or the Send & export step. The panel checks the current completed preview's settings, footprint, layer schedule, geometry, captured filament data and output preparation. Opening it changes no settings and exports or sends nothing. Details explain the results; review actions open the existing controls. A stale preview needs Refresh preview. With Region Edit changes, Restore edited preview settings preserves the edited heights and groups. See Check print readiness.
46b. Why can Export HFP and Send to HueForge have different readiness results?
Native HFP files and direct sending through HueForge's public SDK have separate preparation limits. A valid HFP can remain exportable when direct sending is unavailable. Read the output-specific details under Some outputs need attention. Connect opens the existing connection tools, and readiness's Send button uses the normal direct sender. Receiver capabilities and native unsaved-project handling still apply. File destination, permission and overwrite checks happen when you actually export.
Large full-plan images are automatically resized to HueForge's SDK limits of 8192 pixels per side and 16,777,216 pixels total. The resize applies only to the transfer copy and appears in the result. Source images, saved projects, HFP exports and physical print dimensions stay unchanged. Fine details can be lost; oversized Jigsaw plans still need HFP export to preserve their cuts.
46c. Does Ready to export prove that my print or TD measurements are correct?
No. It reports software preparation checks. TD values and owned flags come from the captured library; they do not prove measured spool values, remaining quantity, actual colors or printer behavior. Confirm the first and regular layer heights, changes, bed fit and final mesh in your slicer. Review advisories can remain while a valid output is available.
46d. Why are physical checks not applicable, or why is Export PNG instead offered?
Image workflows prepare a PNG and leave physical print planning to HueForge. They do not produce an HFP or printable layer schedule. If a stack's HFP preparation fails but its completed image is valid, Export PNG instead can save that image. It carries neither the physical plan nor puzzle cuts; correct the plan before exporting HFP.
47. Why does Send to HueForge sometimes open a dialog and sometimes not?
One suitable receiver is used immediately. Multiple instances require a destination choice. No detected receiver can cause Simpliforge to launch installed HueForge and wait for its plugin. A full-plan replacement uses HueForge's native unsaved-project handling; explicit image-only import still asks for confirmation in HueForge. These protect different actions. See Send to HueForge.
48. Does Connected or Image submitted mean HueForge has finished rebuilding?
No. Connected means the receiver responds. Image submitted means a queued image operation was accepted. The SDK does not confirm request-specific rebuild completion. A verified image receipt checks the data, not the finished mesh. If status is uncertain, inspect HueForge before sending again; recovery never automatically resends.
49. Why does restarting HueForge help when restarting Simpliforge does not?
The bridge runs inside HueForge. Restarting the client cannot reload that plugin or replace an old copy already in memory. Save work, close HueForge, verify that the current compatible plugin is installed/enabled, and reopen it. Refresh status and allow a busy host to respond. Current bridge recovery improves transient failures but does not make incompatible binaries compatible.
50. What should I send with a useful bug report?
Include application version, operating system, workflow, exact message, relevant HueForge/bridge version, and repeatable steps. Use documentation examples where possible. For geometry issues, state width, layer heights, and export/transfer type. A .simpliforge embeds artwork and filament data, so share only an authorized copy. See Troubleshooting.
For more detail, enable Preferences -> Debugging & support -> Detailed debugging, reproduce the issue, and choose Save support log. Attach the resulting .log file, then switch debugging off when finished. Logs stay local and do not embed images, projects, or filament libraries.
Preferences and defaults
51. Can I make a 3.2 mm depth limit the default for new projects?
Yes. Set Print -> Hard maximum depth to 3.2 mm, open Preferences -> Manage defaults, select Hard limit layer depth (mm), and choose Save defaults. Select any other reusable fields you want to keep. Turn Retain settings for new images off so saved defaults apply to new images. Existing projects, presets, profiles, and recovery restore their own settings. See Defaults for new projects.
52. How do I change or clear a saved default?
Adjust the ordinary control, then choose Use current beside its field in Manage defaults and save. Uncheck a field to use its built-in default, or choose Clear saved defaults and save to remove all overrides. Cancel leaves the saved defaults unchanged. Image content, sampled colors, filament identities, and imported geometry remain project-specific.
53. Why are Litho, Hidden Litho, Jigsaw, or some refinement controls missing?
Preferences -> Show experimental features is off by default. Turn it on to show Litho, Hidden Litho, Jigsaw, Avoid artifact colors, and Flatten color patches. Hiding them preserves existing project settings, results, and saved experimental defaults. See Experimental features and Guided refinement.
54. Is Guided refinement still experimental?
No. Guided refinement remains available with experimental features hidden. Experimental artifact weighting and patch flattening recipes appear only when Show experimental features is on. Restart an open Guided comparison after changing the preference before applying its result. Hidden Litho is not supported because both its viewing conditions must be judged together.
55. Can I change the interface language?
Yes. Preferences -> Language offers English and translation previews for French, German, Spanish, Italian, Polish, Korean, Dutch, Ukrainian, Cantonese (Traditional Chinese), and Japanese. The interface updates immediately without changing project settings. Some detailed help, technical diagnostics, native dialogs, and the user guide remain in English.
56. Can I change the application's colors?
Yes. Preferences -> Themes offers Windows System (Light/Dark), Daylight Delight, Midnight Mode, Matcha Mission, Ocean Current, Grape Escape, and Sunset Circuit. System follows light/dark appearance; the other choices keep a fixed palette. Your theme is saved across restarts without changing image pixels or filament colors.
57. Can I reopen a recent project?
Choose File -> Recent projects for the last eight successfully opened or saved projects. The list is separate from Recent images and survives a restart. If a file has moved, use Open project to find it again. Recent entries do not replace saved backups.
58. What do the colors beside base and final filaments show?
They show each filament's library color beside the listed items and current selection. Use them to find a spool quickly, then confirm its name and measured data. Layered blends can differ from a single spool's swatch.
59. How much data do support logs keep?
Detailed debugging starts off. When enabled, each active log is limited to 5 MiB, with three older logs retained. Save support log exports the available diagnostic history and an application summary. Artwork, project contents, and filament libraries are excluded; file paths and likely secrets in messages are redacted. No logs are uploaded automatically. Switch debugging off after reproducing the problem; previous logs can still be exported. See Detailed debugging and support logs.
60. Can I skip or replay the first-run walkthrough?
Yes. Skip walkthrough dismisses the automatic welcome and remembers your choice locally. Starting or completing a tour also dismisses it. Open Help (F1) -> First project walkthrough to replay the nine-step tour, ending at Send to HueForge. Back, Next, the lesson selector, More detail and Escape remain available while learning.
61. What do the advanced walkthrough topics cover?
Choose Help -> Advanced topics or Explore advanced topics in the welcome or completion screen. Sixteen lessons cover planning settings, feature workflows, image editing and print finishing. Topics include Region Edit selections, assigning heights, cleaning islands, reversible groups, borders, Imprint and mesh export. You can jump directly to the topic you need. Unavailable controls explain the required workflow or preview; experimental features remain opt-in.
62. Does a walkthrough change my project or send anything?
Tour navigation opens tabs and sections, and advanced lessons can enable the Advanced-controls visibility preference. It preserves your artwork, processing settings and result. Real controls still perform their normal actions if you use them, but Next and Finish never generate a preview, apply edits, save, export or send. Click Send to HueForge explicitly when your current preview is ready.
63. Does the spotlight work with different themes?
Yes. Its contrasting outline, halo and Look here label adapt to all seven theme choices. Windows System follows live light/dark appearance. Grape Escape uses lime, Sunset Circuit uses cyan, and the other palettes use coral. Theme changes do not recolor your artwork or filaments. See Interactive walkthroughs.
Return to the full User Guide.